
Mobile Expenses
Mobile Expenses is a mobile-friendly way to enter your expenses from any device. It works with a new user interface of Aqilla, limited to expense documents.
Please note: Not all browsers are equally supported and the best experience is achieved with Chrome (and Android) or Safari (Firefox, Edge, Samsung Internet or Opera should work fine, but may have problems) any other browser might not work correctly. In any case, the browser should be up-to-date
To use Mobile Expenses, the instance has to have Workflow Groups enabled and the correct permissions defined for all document types.
The use of Mobile Expenses and the standard desktop browser-based Expenses are interchangeable. Thus a user could start an expense document using Mobile Expenses and then continue using the desktop version or vice versa.
Note that the current version of Mobile Expenses does not support customisation such as additional user attributes or translation to other languages.
Mobile expenses run on all modern devices and have a changeable layout, according to your device. It features settings to customize the user experience like dark mode, dexterity, and details.
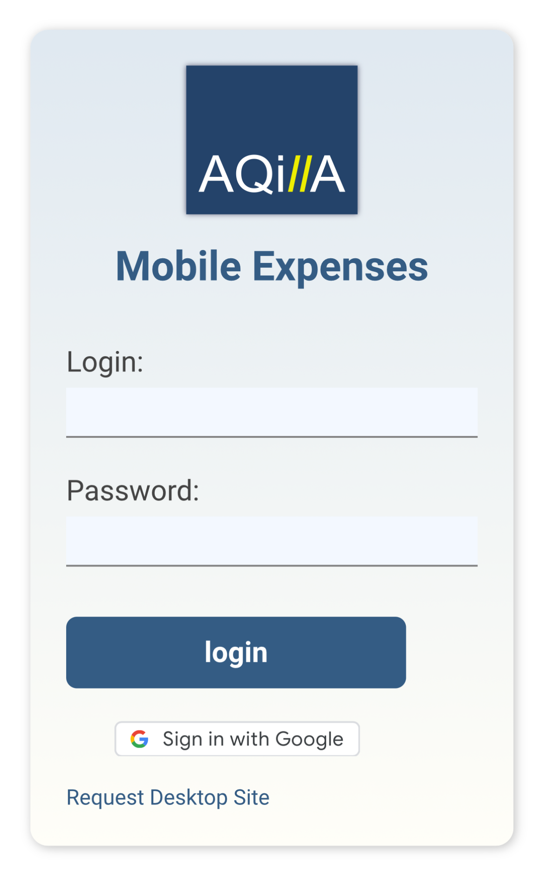
To login into Mobile Expenses select the web browser in your mobile device and enter the following URL: https://m.aqilla.net/your-instance-name
The login page will look as shown on the right.
You can use your Aqilla credentials to log in to the expense only environment, or change to the regular Aqilla view by clicking on Request Desktop Site.
Swipe Actions.
Swipe up / down: scrolling
Swipe left/right on the line form in Expense Lines detail view: navigate between expense lines
Swipe left/right on the footer in Expense detail list view: navigate between expense docs
Swipe right from left side: reveal Hamburger menu (close tap anywhere)
Swipe left (if not overwritten): go back
Swipe right on Expense Doc in List: show context action to that expenses, mainly promotions - setting, close with swipe left or tap anywhere else
Swipe right on Expense Line: show promotions to that expenses line - enabled in Settings
Swipe down when already scrolled to the bottom of the Expenses List will Refresh all data-enabled in Settings
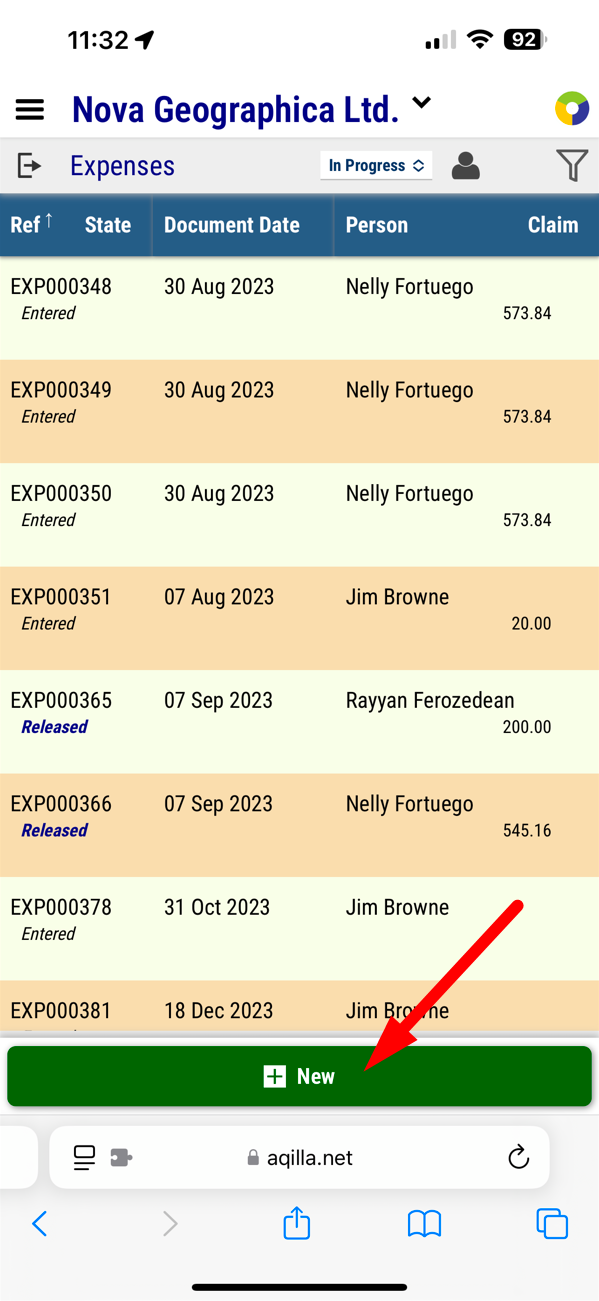
Creating Expenses:
When you are ready to create a new expense document. Click on New at the bottom of the page.
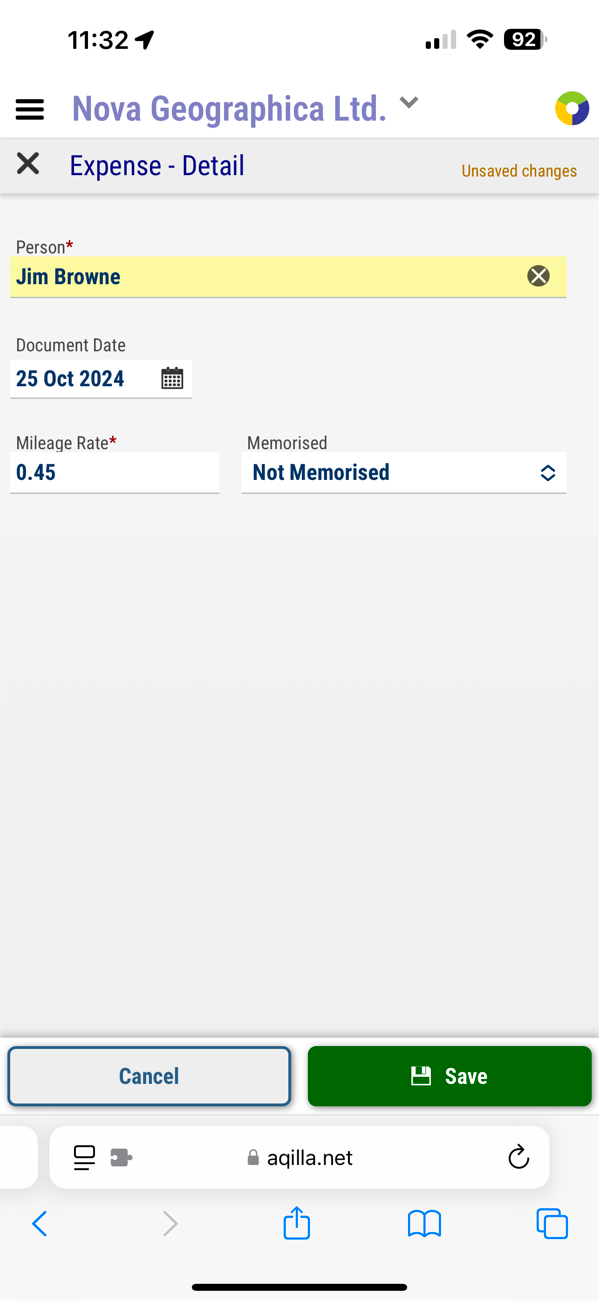
This will create up a new expense document with the following header details. You will need to fill out the Person the expense claim is for, and the date for the document.
Click on Save to continue or Cancel to return to the previous page without creating an expense document.
Person | Who is the expense claim for? |
|---|---|
Document Date | The date of the document. Individual expenses can be entered up to this date. |
Mileage Rate | The rate of return on milage - defaults from the person's details. |
Memorised | Should the document be memorised? |
If you have created expenses in Aqilla before, these fields should look familiar.
Creating New Expenses:
When you create a new expense you are presented with the following page. You can see the Document Reference in the header, the person you are creating the expense claim for, and the document date from the previous page. The header section can be expanded to view the other fields if required.
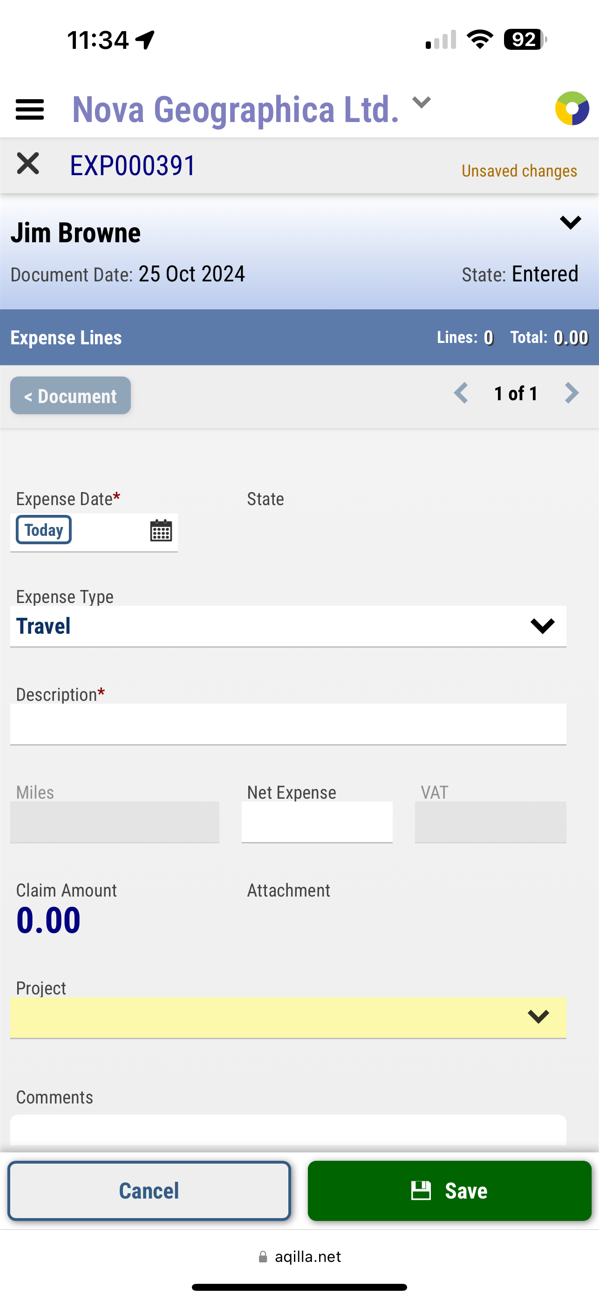
To proceed you need to fill out the document date. Please note that you can click on the Today button to select today's date, or you can select the little calendar in the field to get a popup with more date options. Then you need to fill out the Expense type, the Description of the expense and how much the expense claim should be. Select a Project if that is required for your expense analysis.
Finally, you get the option to add a comment to the expense claim. This option is also available in Aqilla Desktop version but has been moved to a new and more convenient spot.
When you are done with the document line fields, click on Save to continue with the expense claim, or Cancel to abandon the information.
When you have pressed Save, you will be presented with a summary screen of the expense, and gain the option to add an attachment to the expense claim. This may be done by taking a photo of the claim document or uploading a file that has already been saved on your device.
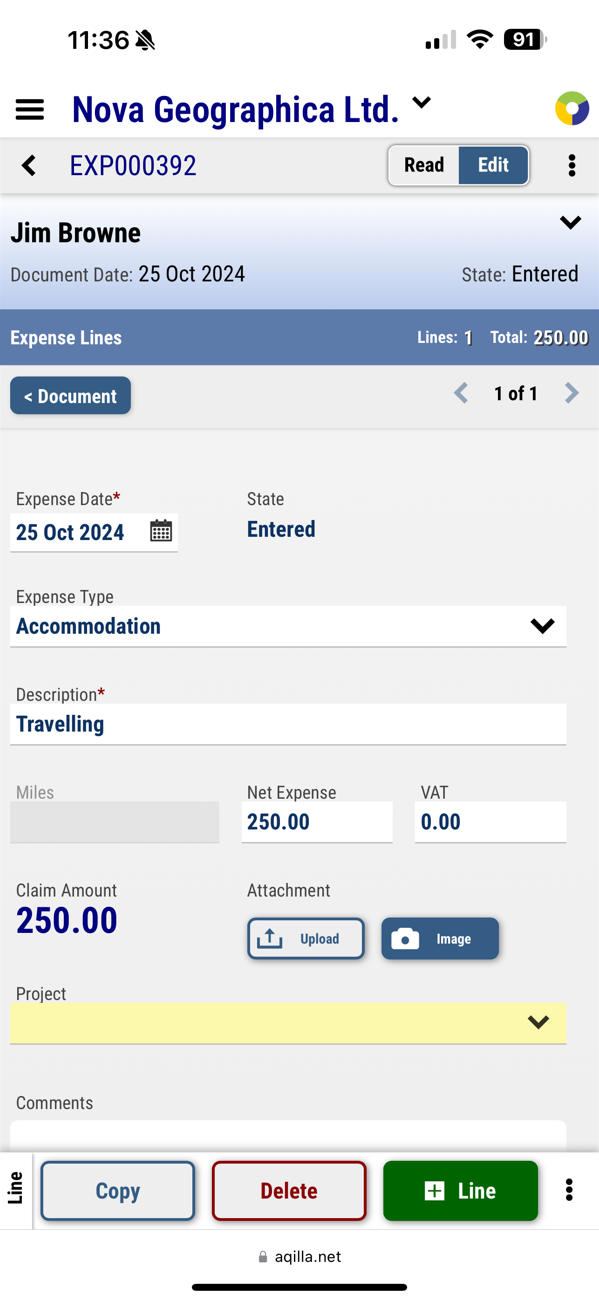
You can add more lines to your expense document, by pressing Copy to copy the current expense information into a new line, or you can press the +Line button to add an empty line. If you do not wish to keep the expense claim information, you can press the Delete button.

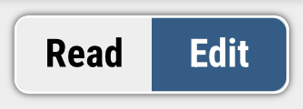
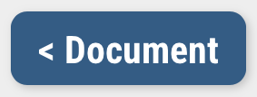
Please note that there are two new options available in the top corners of the page.
Switch between Read-only mode and Edit mode. | Go back to the document details layout. |
 |  |
When you are done with your expense claim, you should release the document for approval.
Releasing a Document:
Normally expense documents would be released for approval once all the information has been filled out. This is the final step to move the document along.
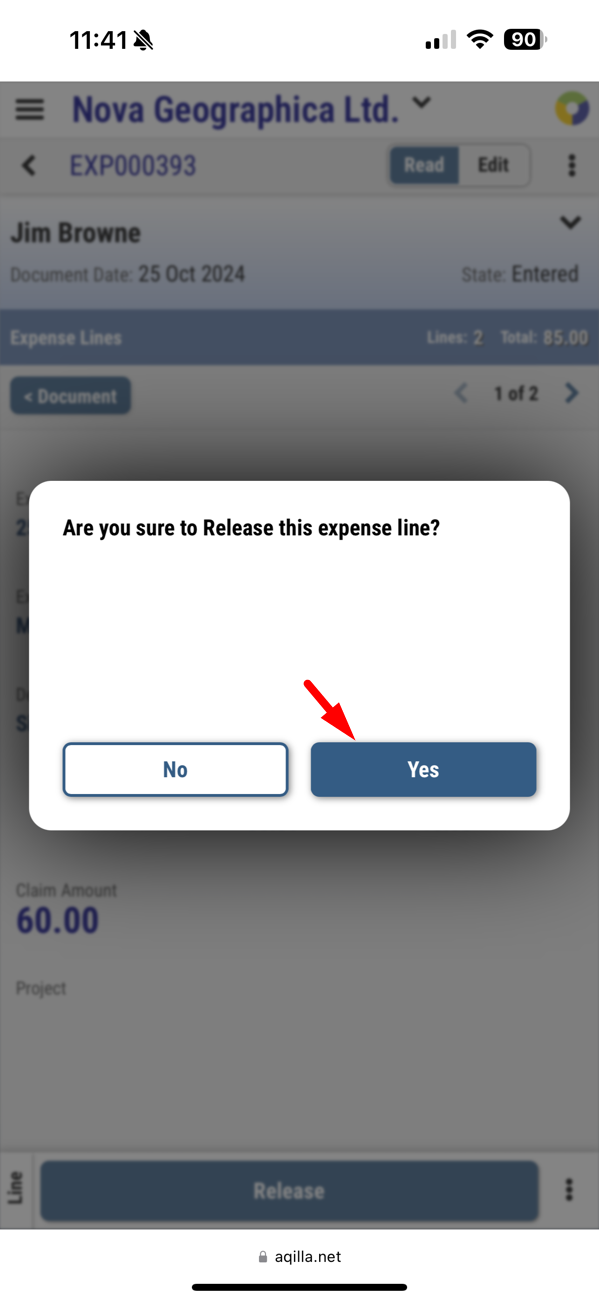
You will then be prompted to confirm you want to release the document
Press Release to Proceed or No to go back to the expense document.
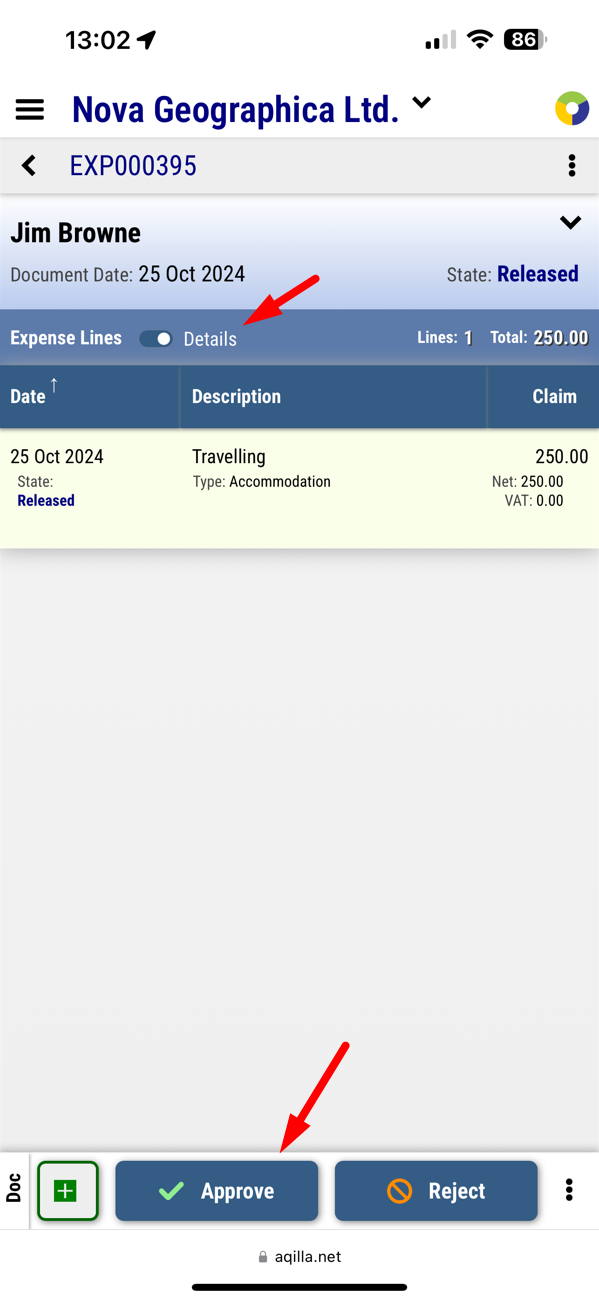
When the document has been released. The final page is a summary of the expense document and will show you the person, the date, and the state of the document.
If you are an expense approver, this is where you can see the options to Approve or Reject the expense document.
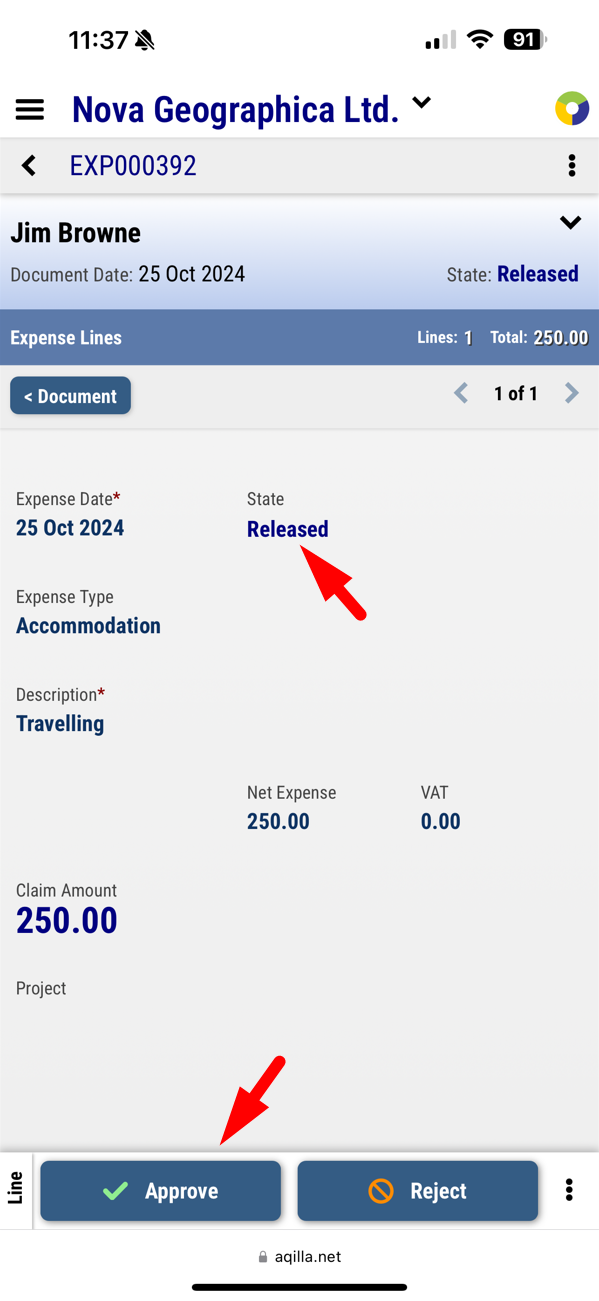
Approving an Expense Claim
Click on the relevant Released expense claim.
You will be presented with an overview of the document, and the option to Approve or Release the document.
Note that when viewing an expense document you have the option to show the details of each line or just a compressed summary of each expense line. In either case, selecting a line will show the full-screen detail line view.
You will also have the option to add a new expense document by pressing. 
Please note that the new document will require it to be released and approved separately from the other documents.
Expense Lines:
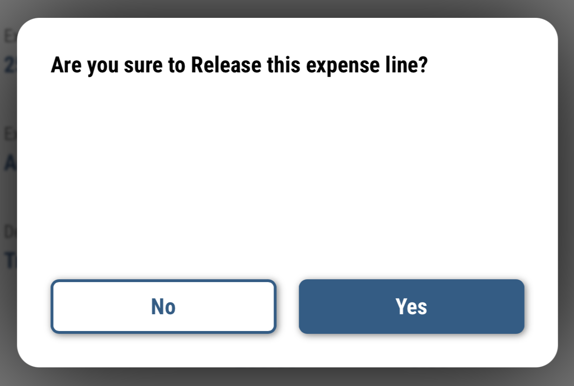
Expense lines can be added and approved separately from an expense document. This means that your main document may be Rough Posted, and you can still add new document lines to it, but the new document line will be in an Entered state, not Rough Posted.
This is not often used and can cause some confusion since an added line can be in a different work state than the document it resides in. It works exactly like adding an expense line, but it will be released and approved separately from the main document.
You simply have to enter the line like normal, and then you will then be prompted to confirm you want to release the document line.
Press Yes to Proceed or No to go back to the previous page.
If you are an expense approver, this is where you can see the options to Approve or Reject the expense line.
This is only relevant if your workflow allows you to approve or reject individual expense lines.

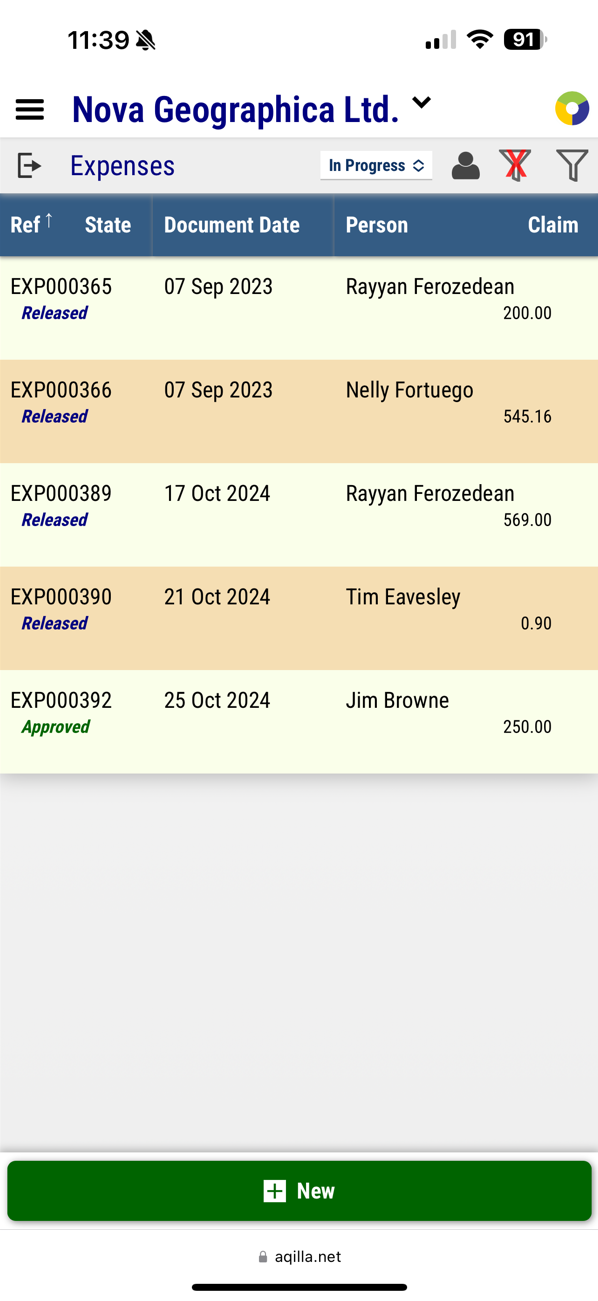
The Default View
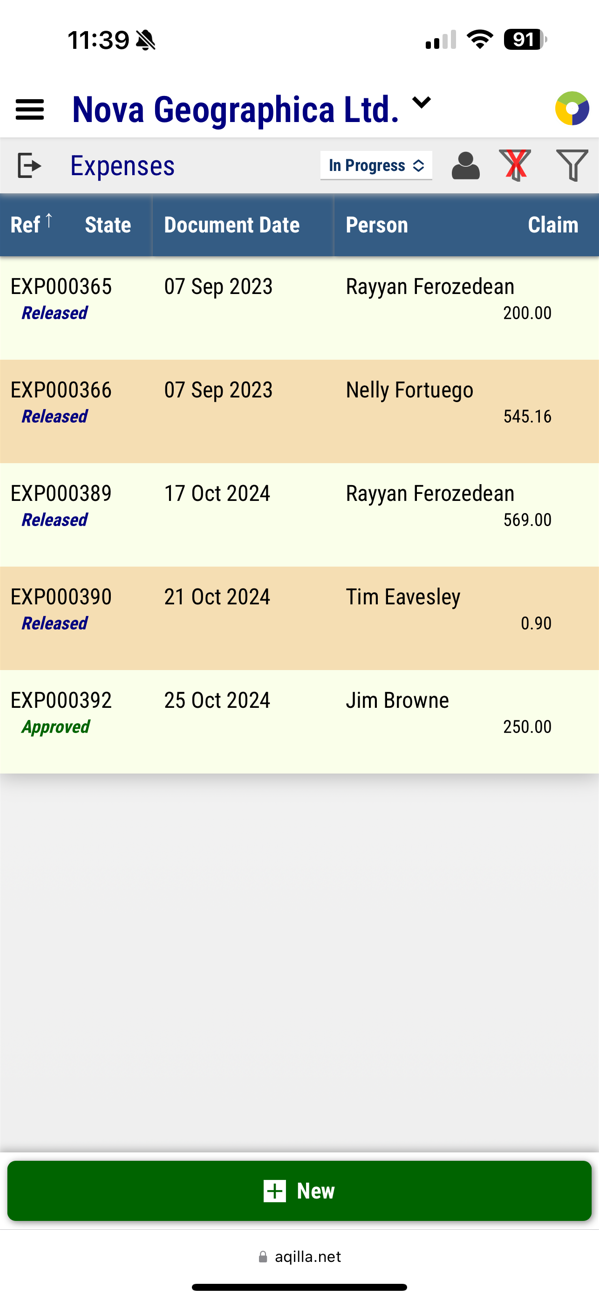
After login in, you will be greeted by the Expenses document summary screen showing all documents in progress. The screen depends on the filter, amount of expenses, screen size, orientation and settings.
The view below shows the document Reference, Document Date, Person, the document state and the Expense Amount. The documents visible to you are dependent on your permissions. For instance, you may only be able to access your own expense documents or you may have permission to view other documents for approval.
In the top left-hand side, you have a Settings Menu (
 ) and Logout (
 )
) In the top right-hand side, you have Document Filters (
 )
)By default, you see only documents in progress but you may also select Memorised documents or All documents (subject to another filter criteria you have set.
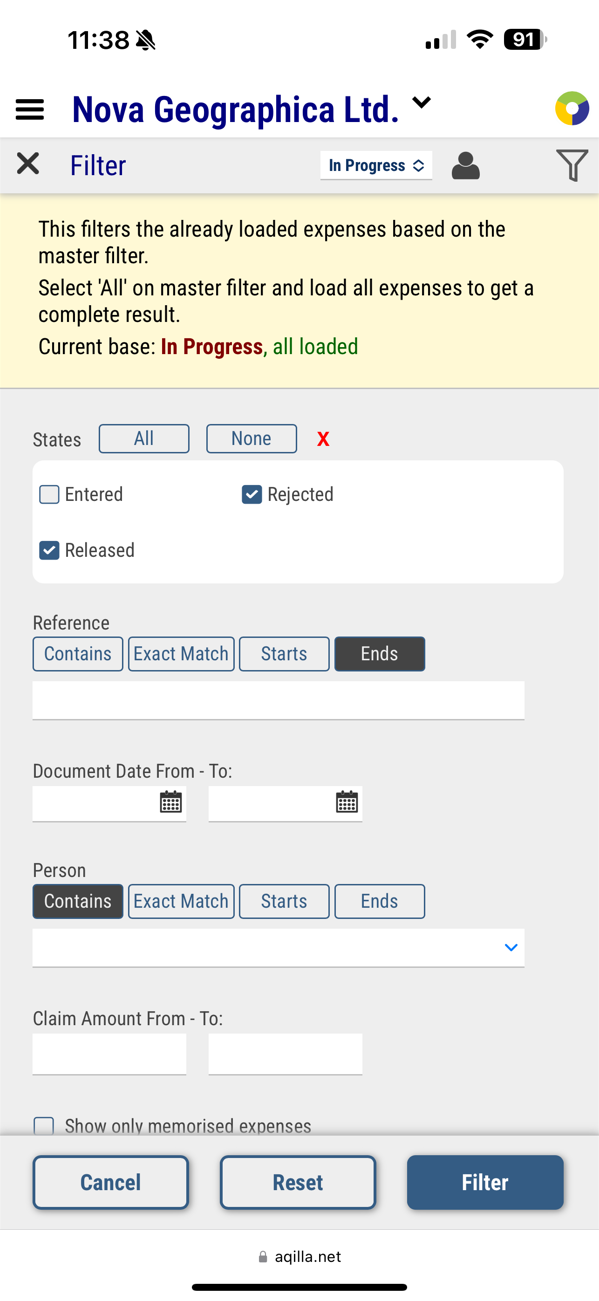
Expense Document Filters.
When you press  you will be presented with the following options. The filters available depends on on the current view. (In Progress / All)
You can select which document states you wish to see. (in Progress filter will show you Entered, Reject and Released.)
Search for a Reference or Person by using a partial part of the reference. (Contains, Starts with or Ends with)
You can also search for an Exact Match for reference or person.
Document date shows only expense documents between the two dates
Claim Amount allows you to limit your search to a specific expense amount.
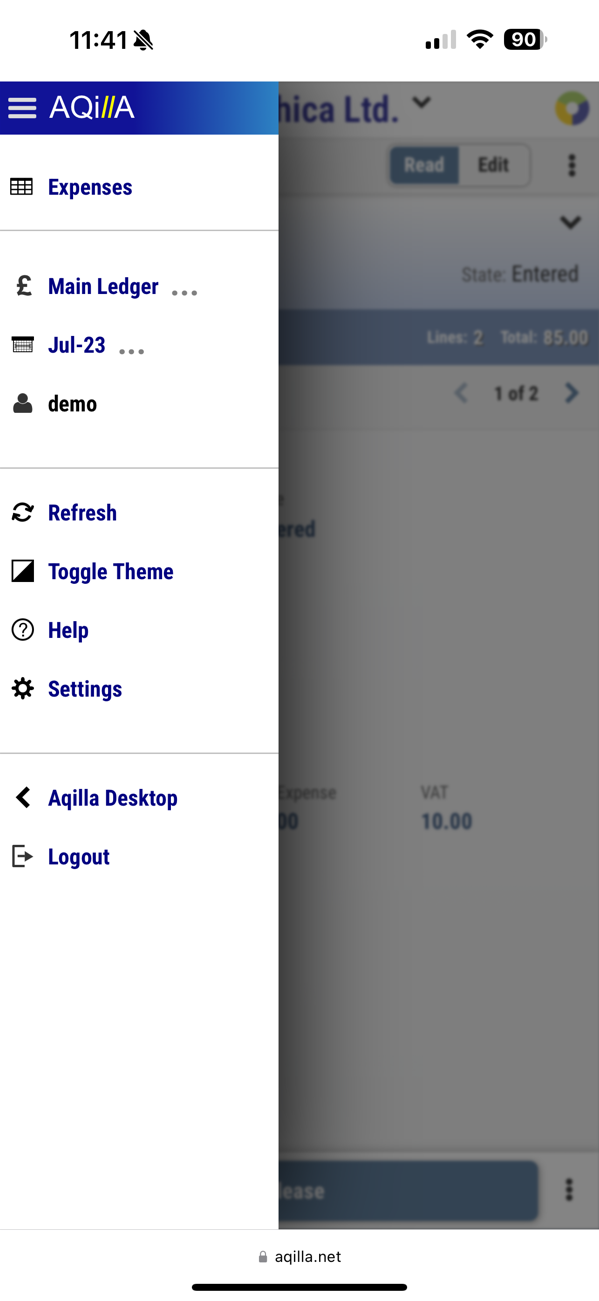
Settings Menu
The main menu on the top left-hand side grants you access to change the ledger, the period and view your login details. You can also Refresh your data, toggle the theme between normal and dark mode. Enable full-screen mode in the browser, go to help, desktop mode or log out.
Parameter | Description |
|---|---|
Ledger | The currently selected ledger: click to change the ledger |
Period | The currently selected period: Click to change period |
User Name | Current username logged in |
Refresh | Refreshes the page |
Toggle Theme | Switch between light mode and dark mode |
Toggle Fullscreen | Set Mobile Expenses to full-screen mode |
Help | Opens up the help menu for Mobile Expenses |
Settings | Opens up Settings |
Aqila Desktop | Switch from Aqilla Mobile Expenses to the regular Aqilla |
Logout | logout: Go back to the login screen |
The settings menu in the Expense app gives you a few unique settings that change the default view and behavior of the mobile app.
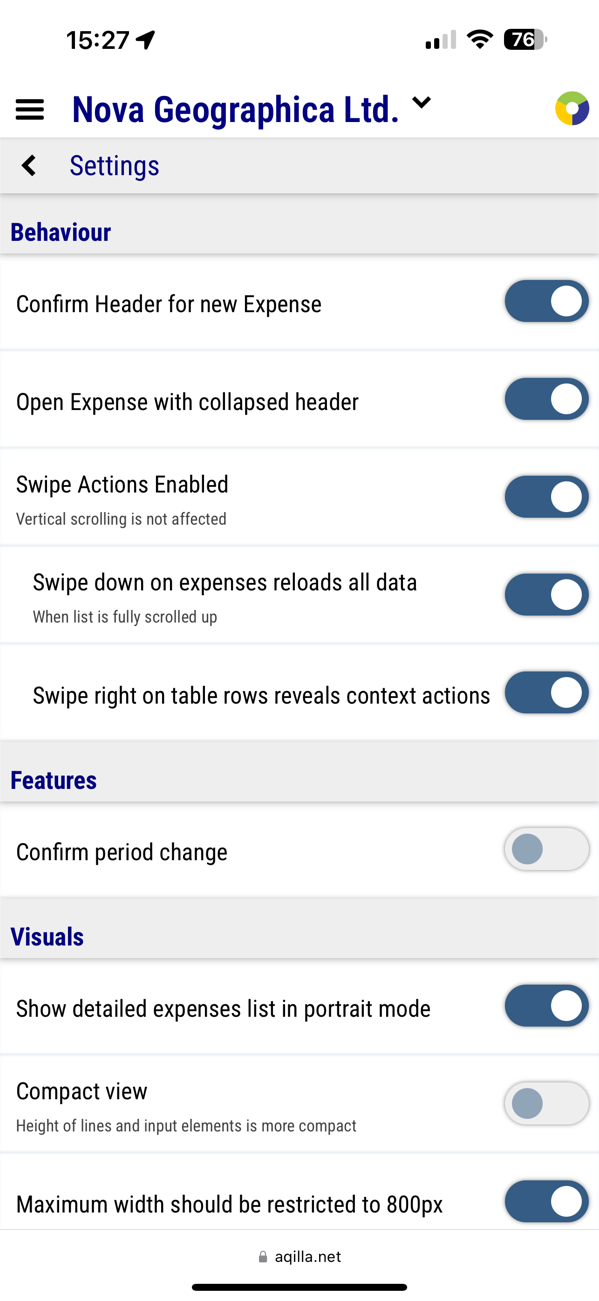
Parameters for Mobile Expenses
Field | Description | |
|---|---|---|
Confirm Header for New Expenses | When this option is on, you need to confirm the header information. | 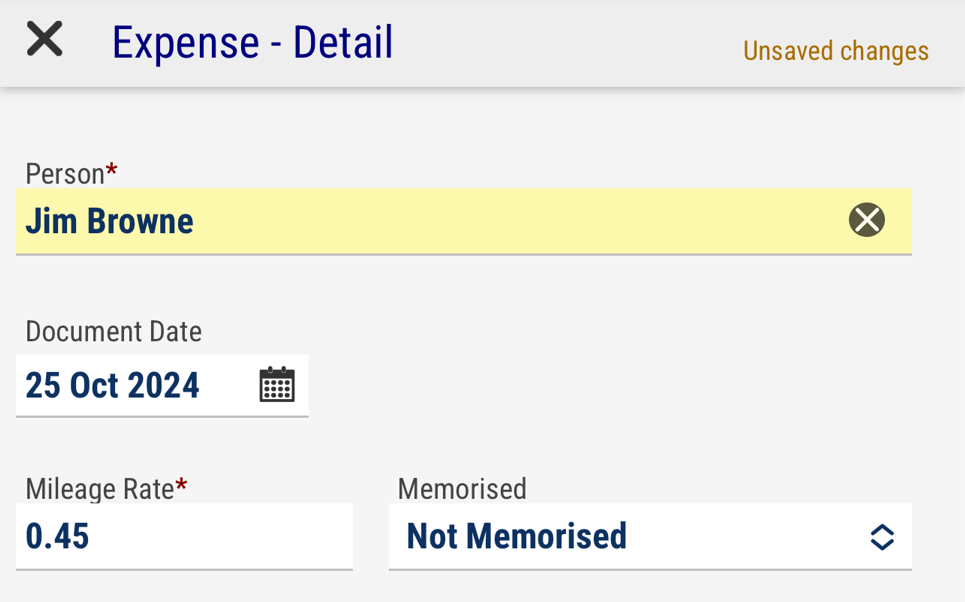 |
Open Expenses with collapsed headers | Expense documents with header information minimized. |  |
Swipe down on expenses reloads all data | Enables swipe action down to reload data | |
Swipe Right to table rows reveals context actions | Enables the ability to swipe right on documents to see actions available. |  |
Confirm Period change | When enabled, will prompt a Yes/No box before changing period | 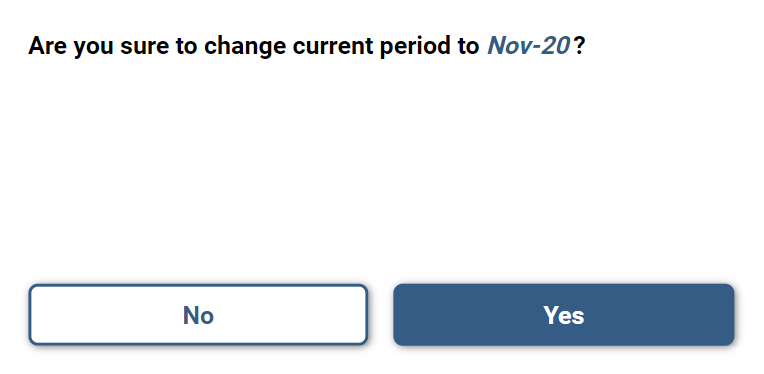 |
Shows detailed expenses list in portrait mode | When enabled, shows more details of the expenses | |
Compact View | Reduces the number of lines shown | |
Maximum width should be restricted to 800px | Limits the view of mobile expenses to 800 pixels. | |
Dark Mode | When enabled, changes mobile expenses to Dark Mode | 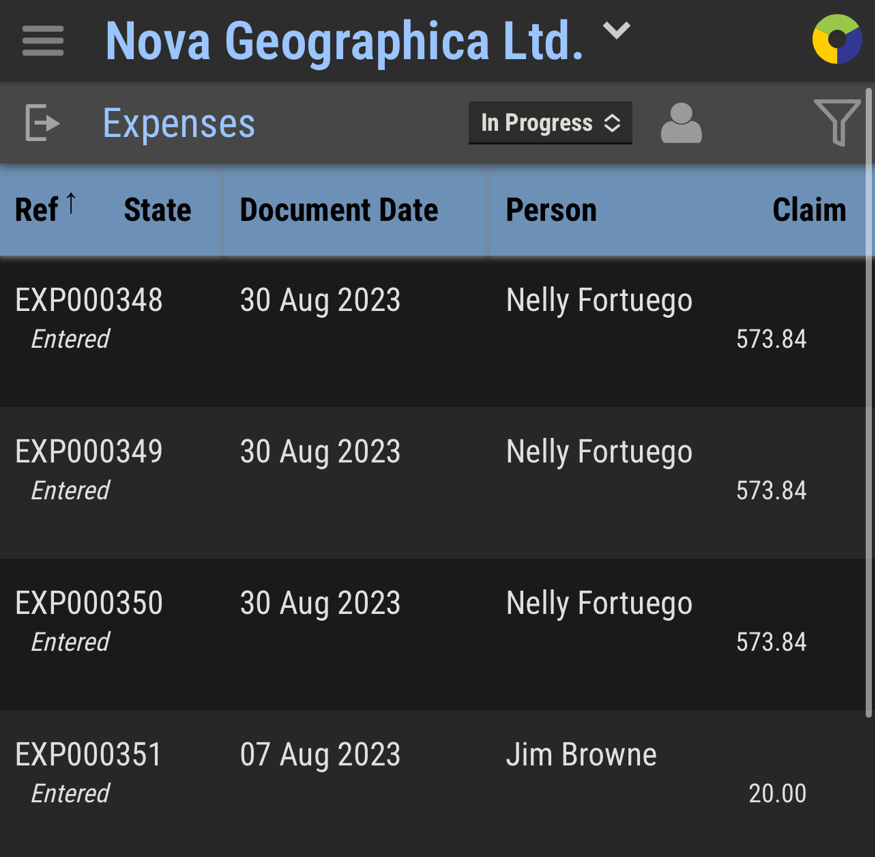 |