How to get started with Automatic Purchase Processing.
To get started quickly:
Enable E2D in Instance Settings
Set up your invoice email inbox
Share the inbox email with suppliers
Review invoices in the inbox
Check and edit data in the Draft Editor
Process invoices into Aqilla
Add automation rules to improve efficiency
Getting Started with Automated Purchase Invoice Processing (E2D)
Introduction
Electronic to Digital invoice processing, known as E2D, allows you to automate the capture and processing of supplier invoices in Aqilla. Instead of manually entering invoice data, the system reads invoices sent by email, extracts key information, and prepares them for review and processing.
This feature requires Workflow Groups to be enabled and is chargeable. For more information, visit: https://www.aqilla.com/solutions/ai-invoice-capture-automation
What this guide will help you do
By the end of this guide, you will be able to:
Enable E2D in your system
Set up a dedicated invoice email inbox
Understand how invoices are received and displayed
Review and edit extracted invoice data
Process invoices into Aqilla
Configure settings to suit your business
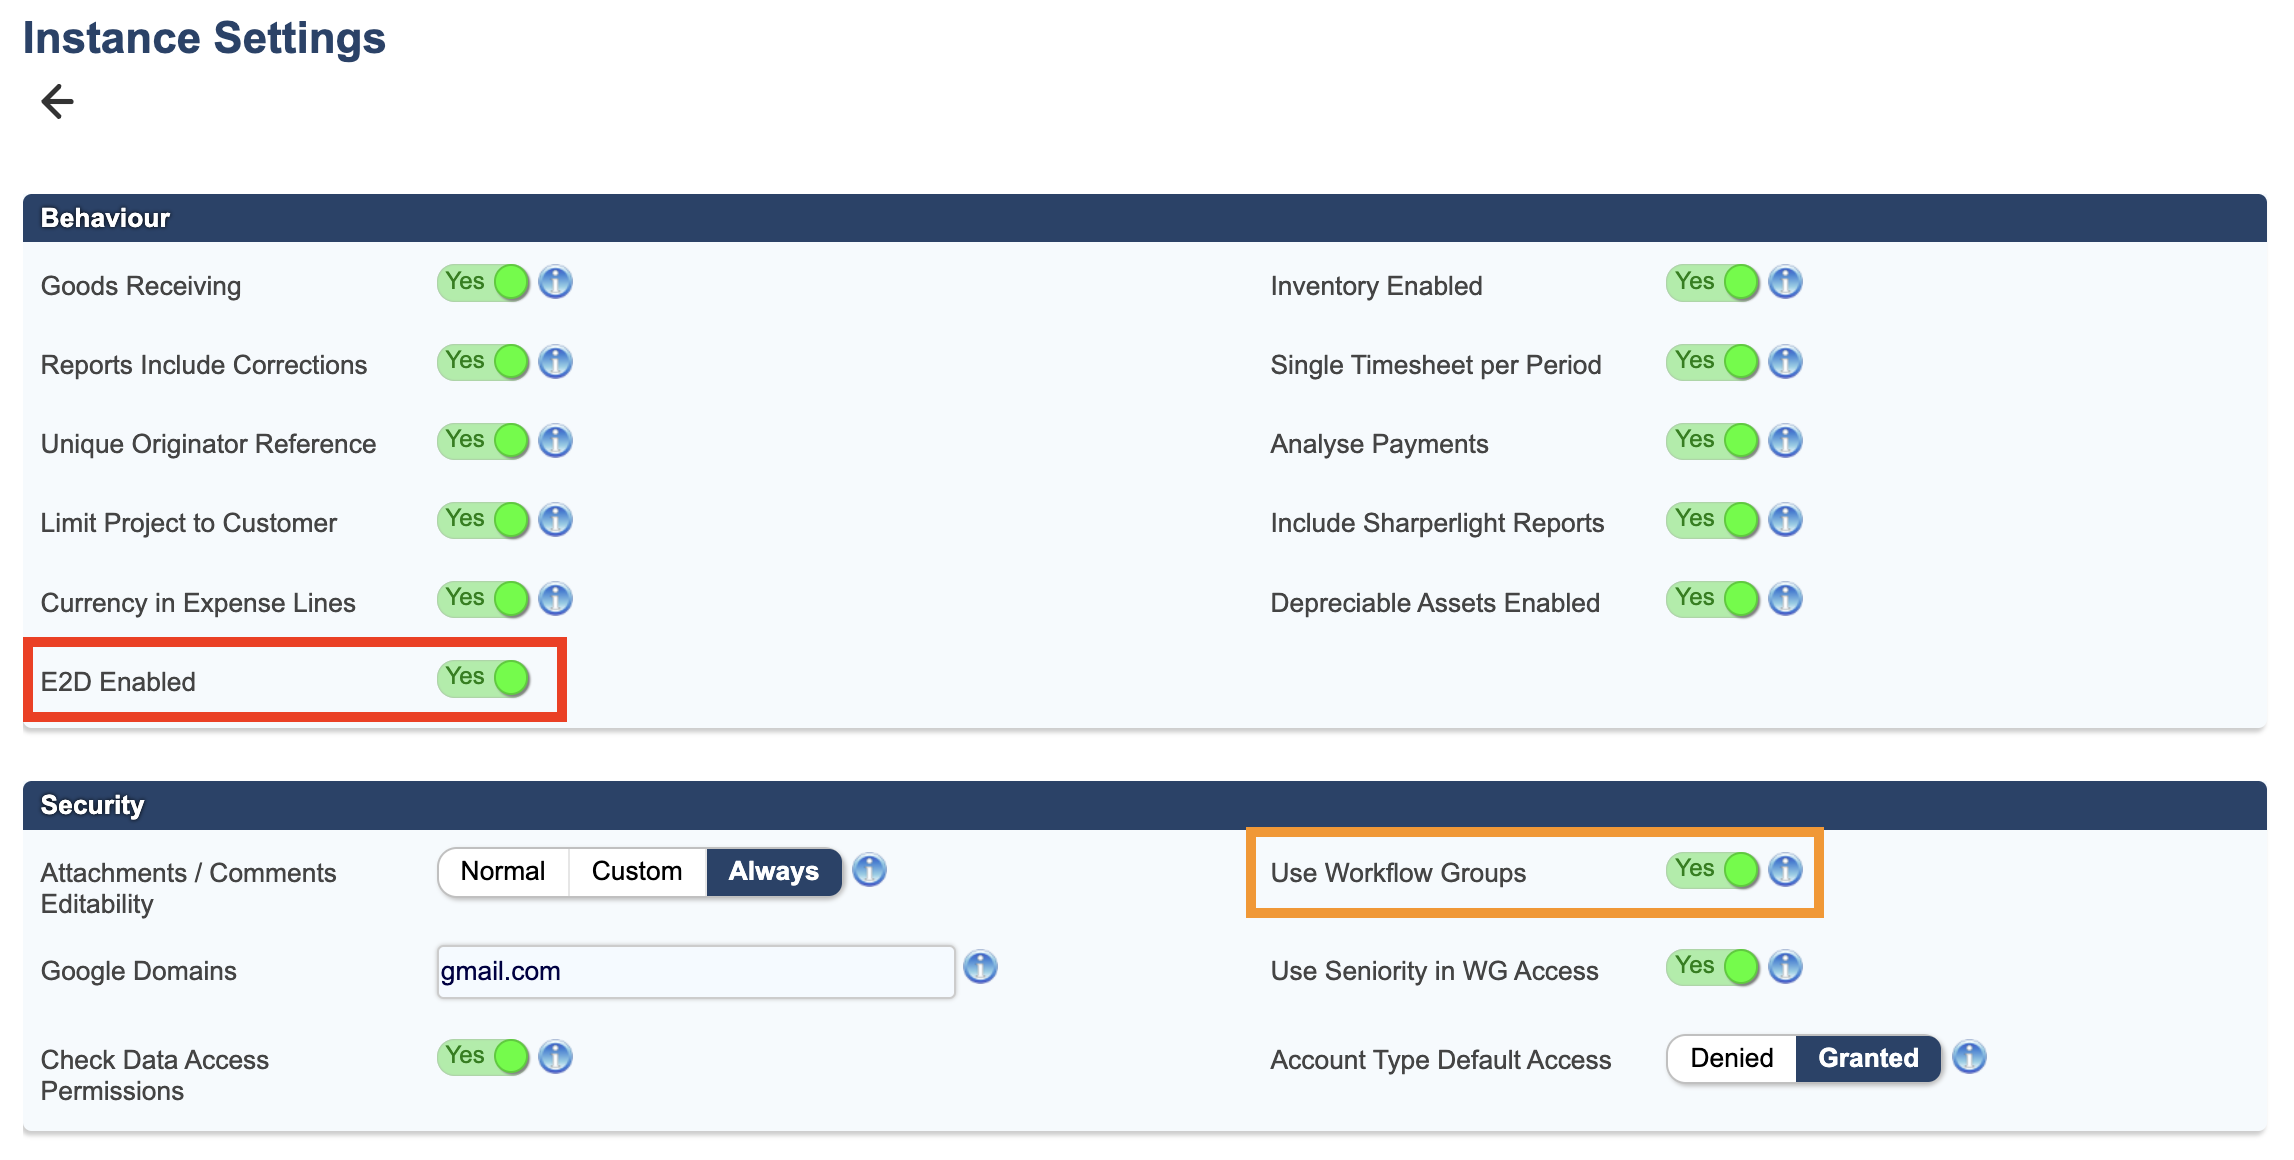
Step 1: Enable E2D
Before using E2D, you need to enable it in your system.
Go to: Configuration -> Instance Settings
Set: E2D Enabled = Yes
Important:
Workflow Groups must be enabled for E2D to work
Enabling E2D will initiate billing
Contact Aqilla Support or your Account Manager before enabling to avoid unexpected charges
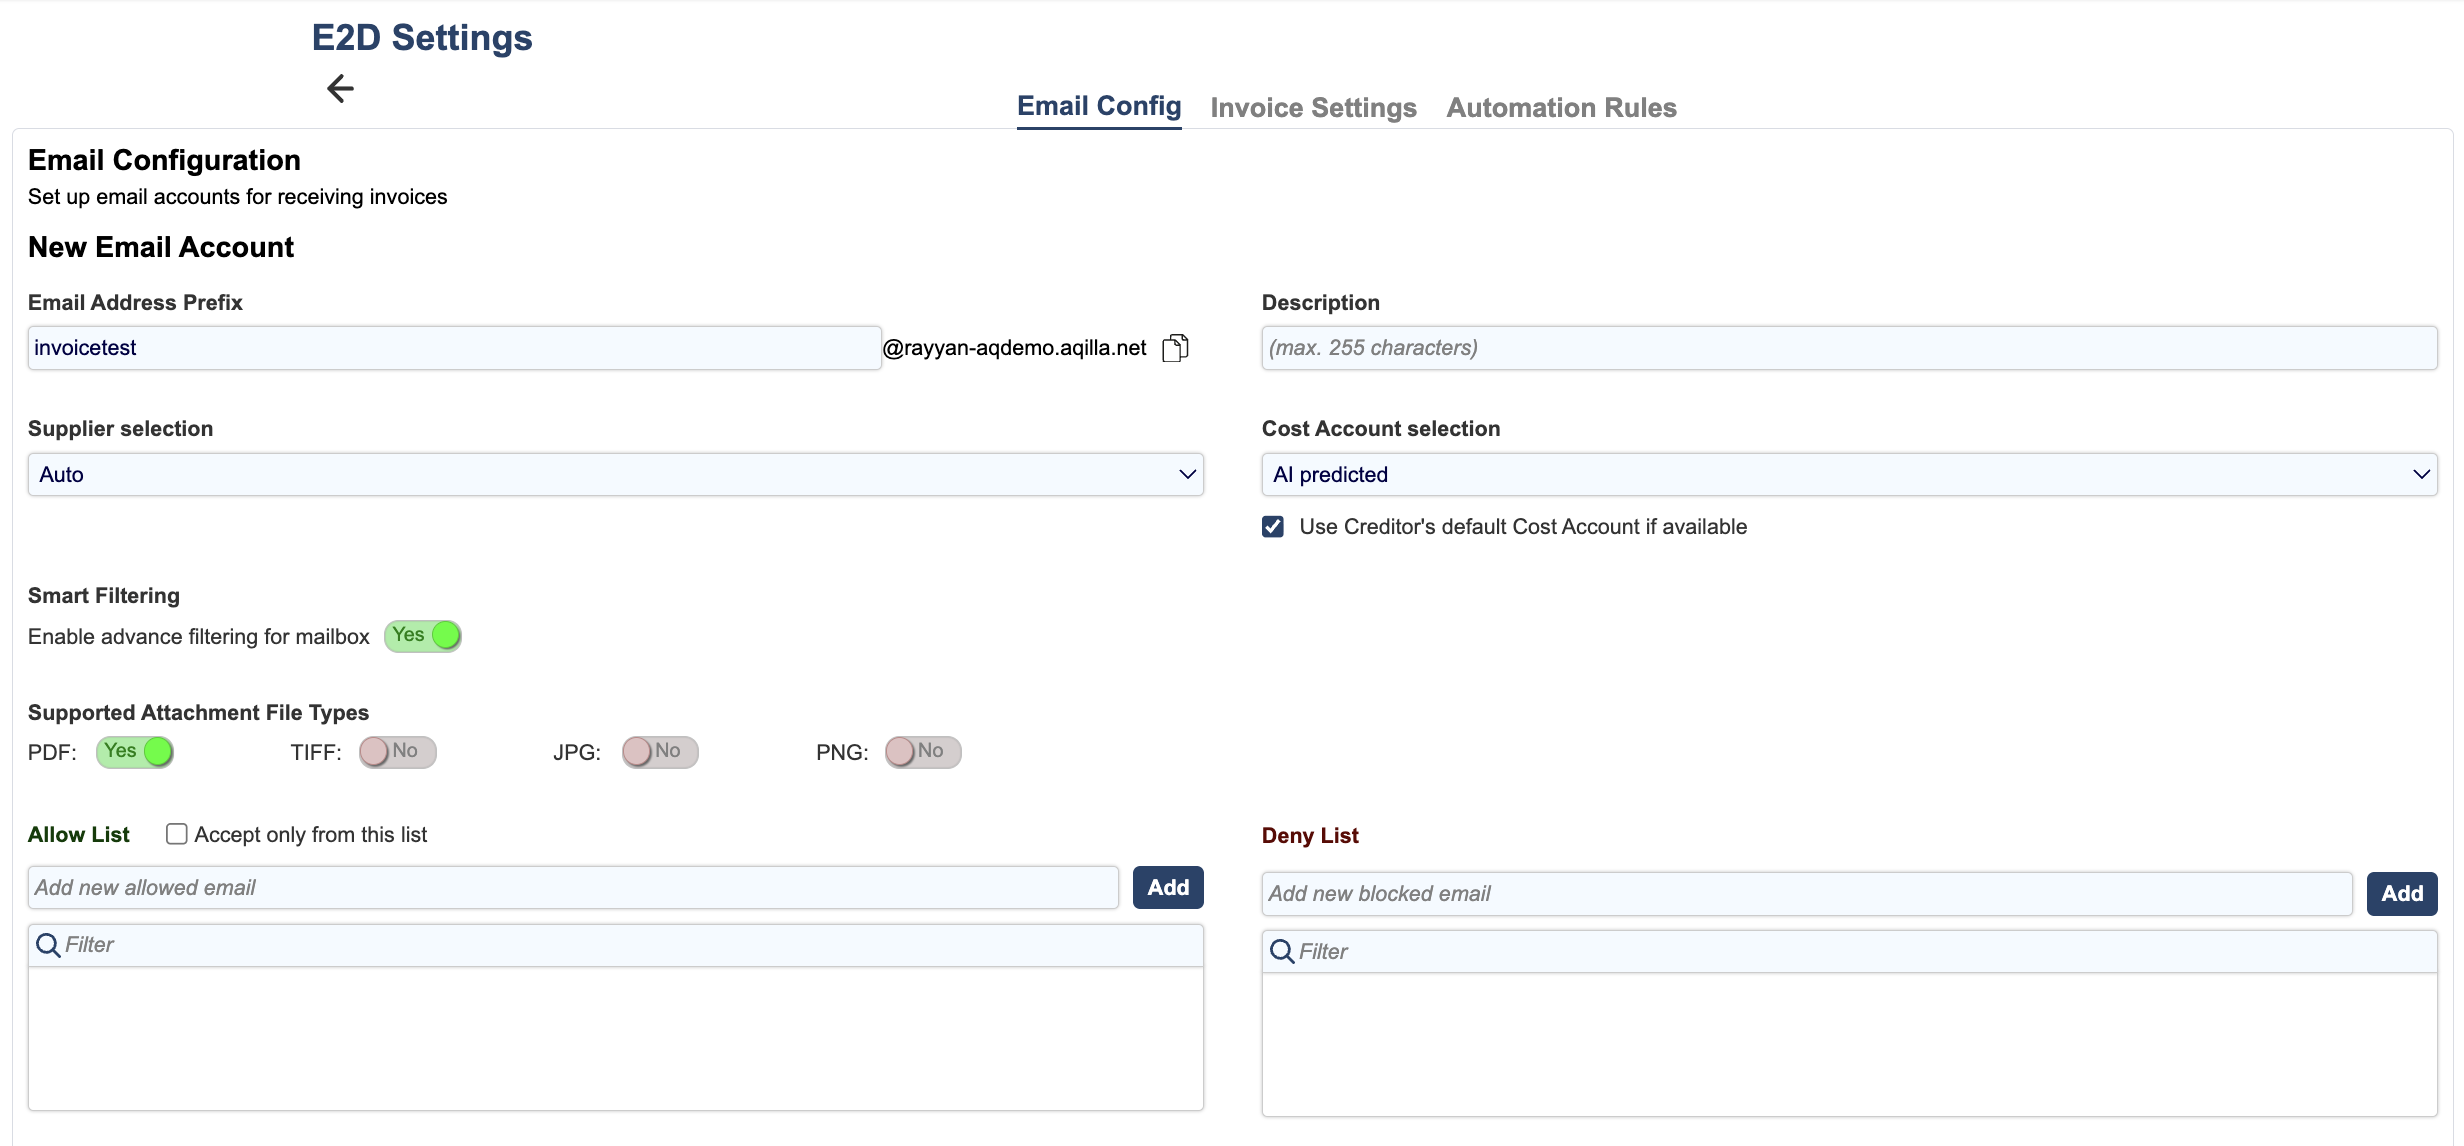
Step 2: Set Up Your Invoice Inbox
E2D works by receiving invoices via email into a dedicated inbox.
Go to: Configuration -> E2D Settings
Click: Create New Email Inbox
You will configure:
Email address prefix (for example: invoices, purchases)
Optional description
Supplier Selection (whether it is auto populated when the invoice is imported)
Cost Account Selection (predicted by AI by default)
Allowed file types (PDF is enabled by default)
Allow list and deny list for email senders
Example email address:
invoices@yourinstance.aqilla.net
Share this email address with your suppliers so they can send invoices directly into your system.
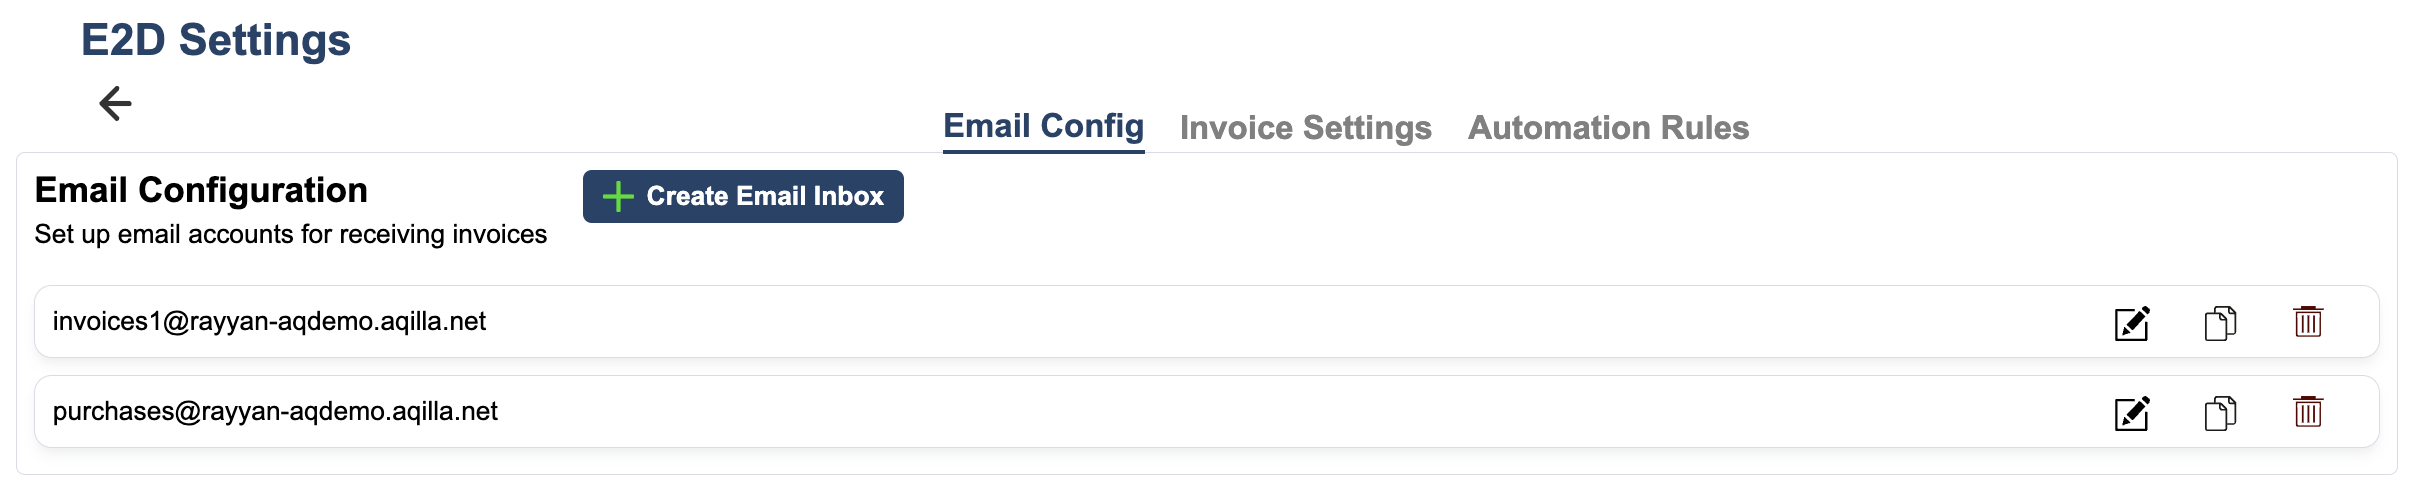
Email Configuration Summary
Email Configuration Details
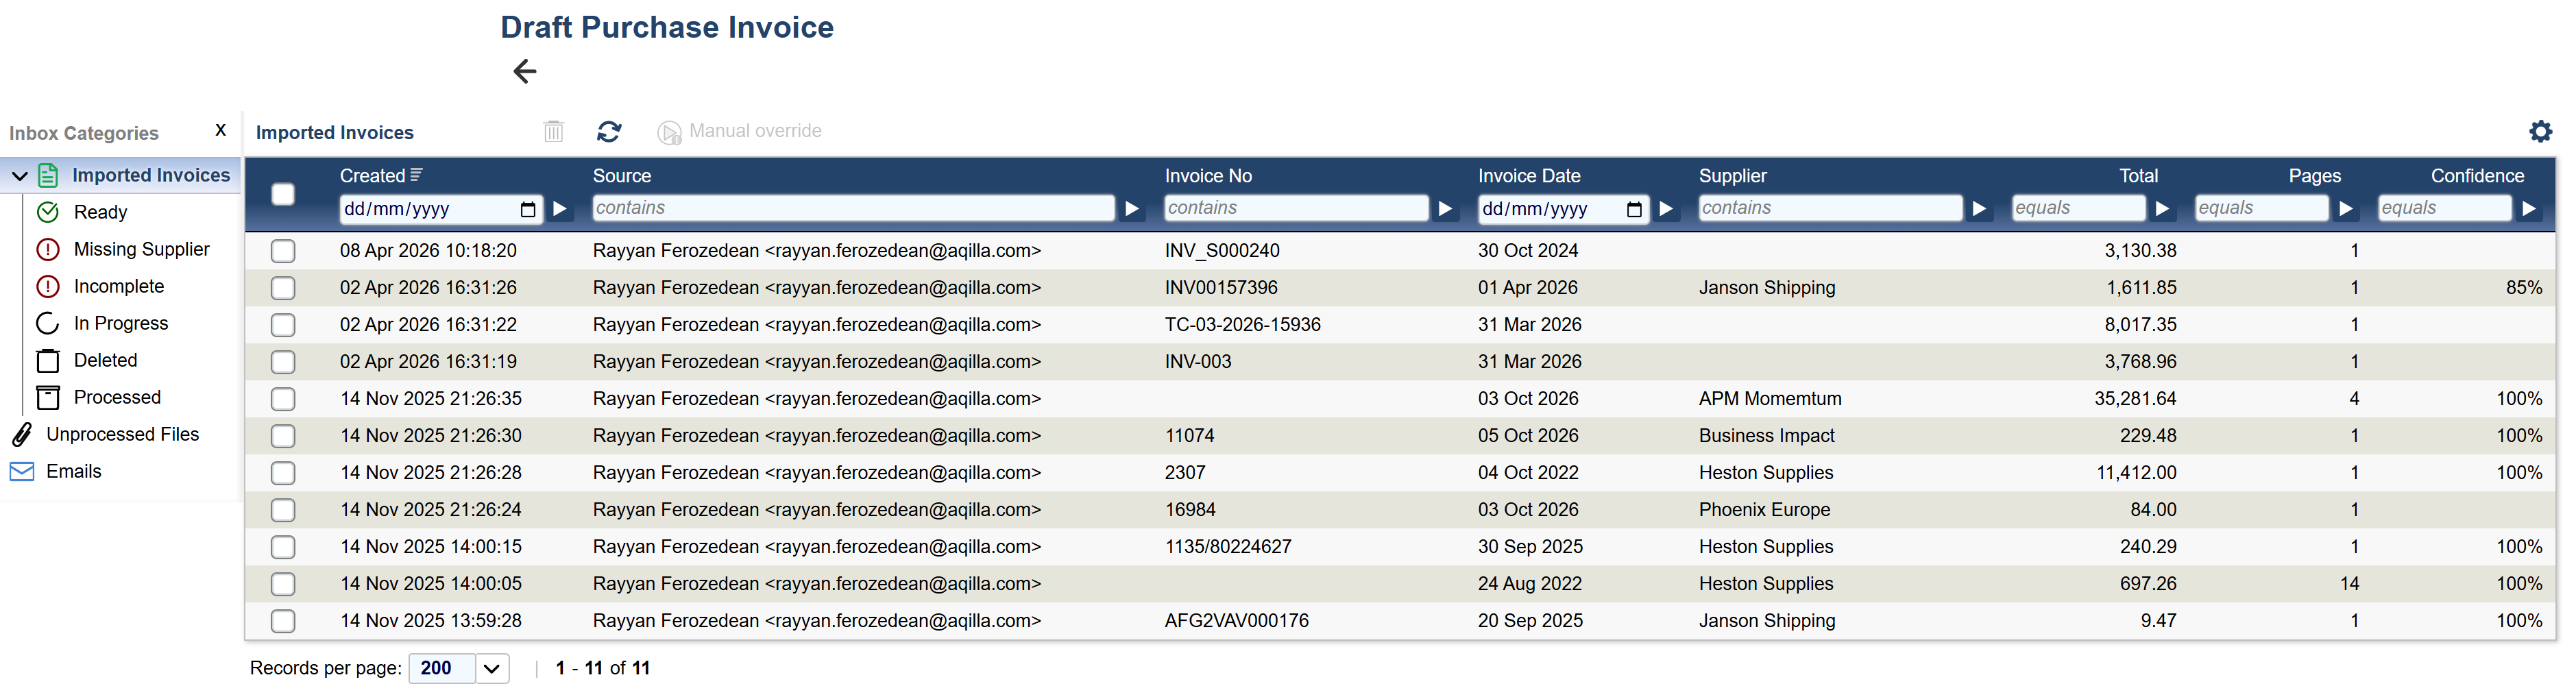
Step 3: Understand the Purchase Invoice Inbox
Once set up, incoming invoices appear in the Draft Purchase Inbox within the Imported Invoices Folder.
This inbox shows:
Received invoices
Invoices ready to process
Invoices that need attention
From here, you can:
Filter invoices (for example, missing supplier)
View imported, deleted, or processed invoices
Open invoices for review
Example: If an invoice shows “Missing Supplier”, you will need to assign one before processing.
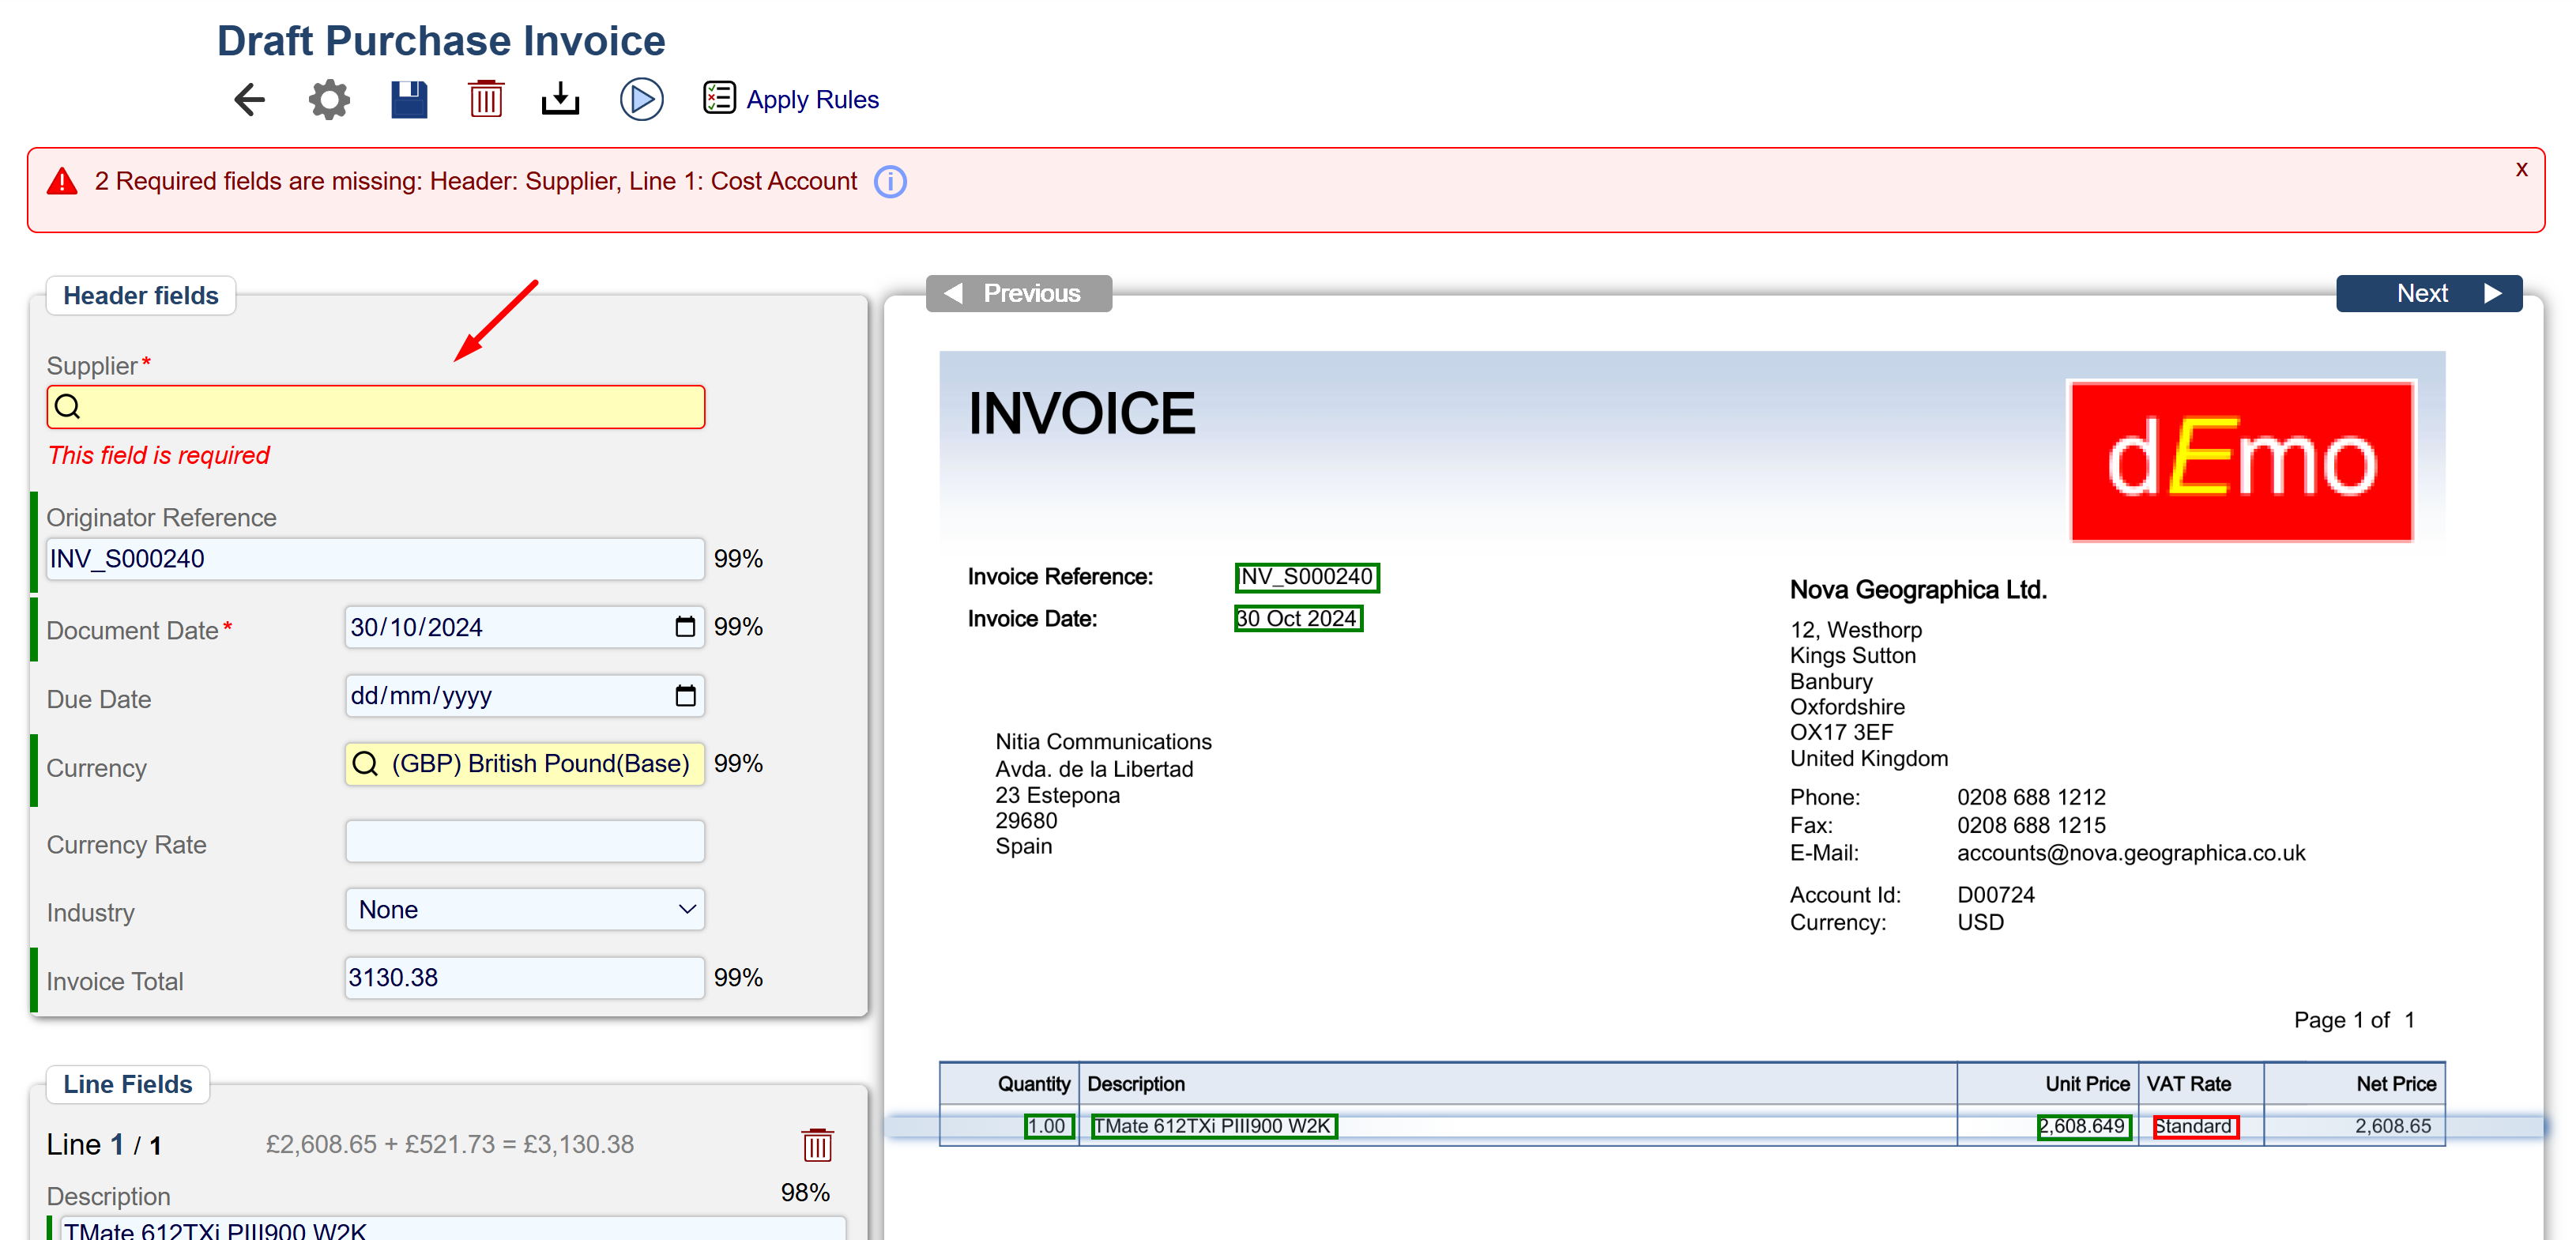
Step 4: Review Invoices in the Draft Editor
Clicking an invoice opens the Draft Purchase Invoice Editor.
This is where the system:
Scans the invoice
Extracts key data (supplier, dates, totals, VAT, lines)
Maps data into Aqilla fields
Each field is given a confidence rating to show how accurate the system believes it is.
What you should do here:
Check all header fields (supplier, date, totals)
Review all line items
Add missing required fields (such as cost account)
Correct anything with low confidence
Key things to know:
Supplier is automatically matched using name and address
Cost account must be entered manually
VAT and totals are calculated from the invoice
You can add or delete lines if needed
You can also:
Save changes
Download the invoice
Move between invoices using Previous and Next
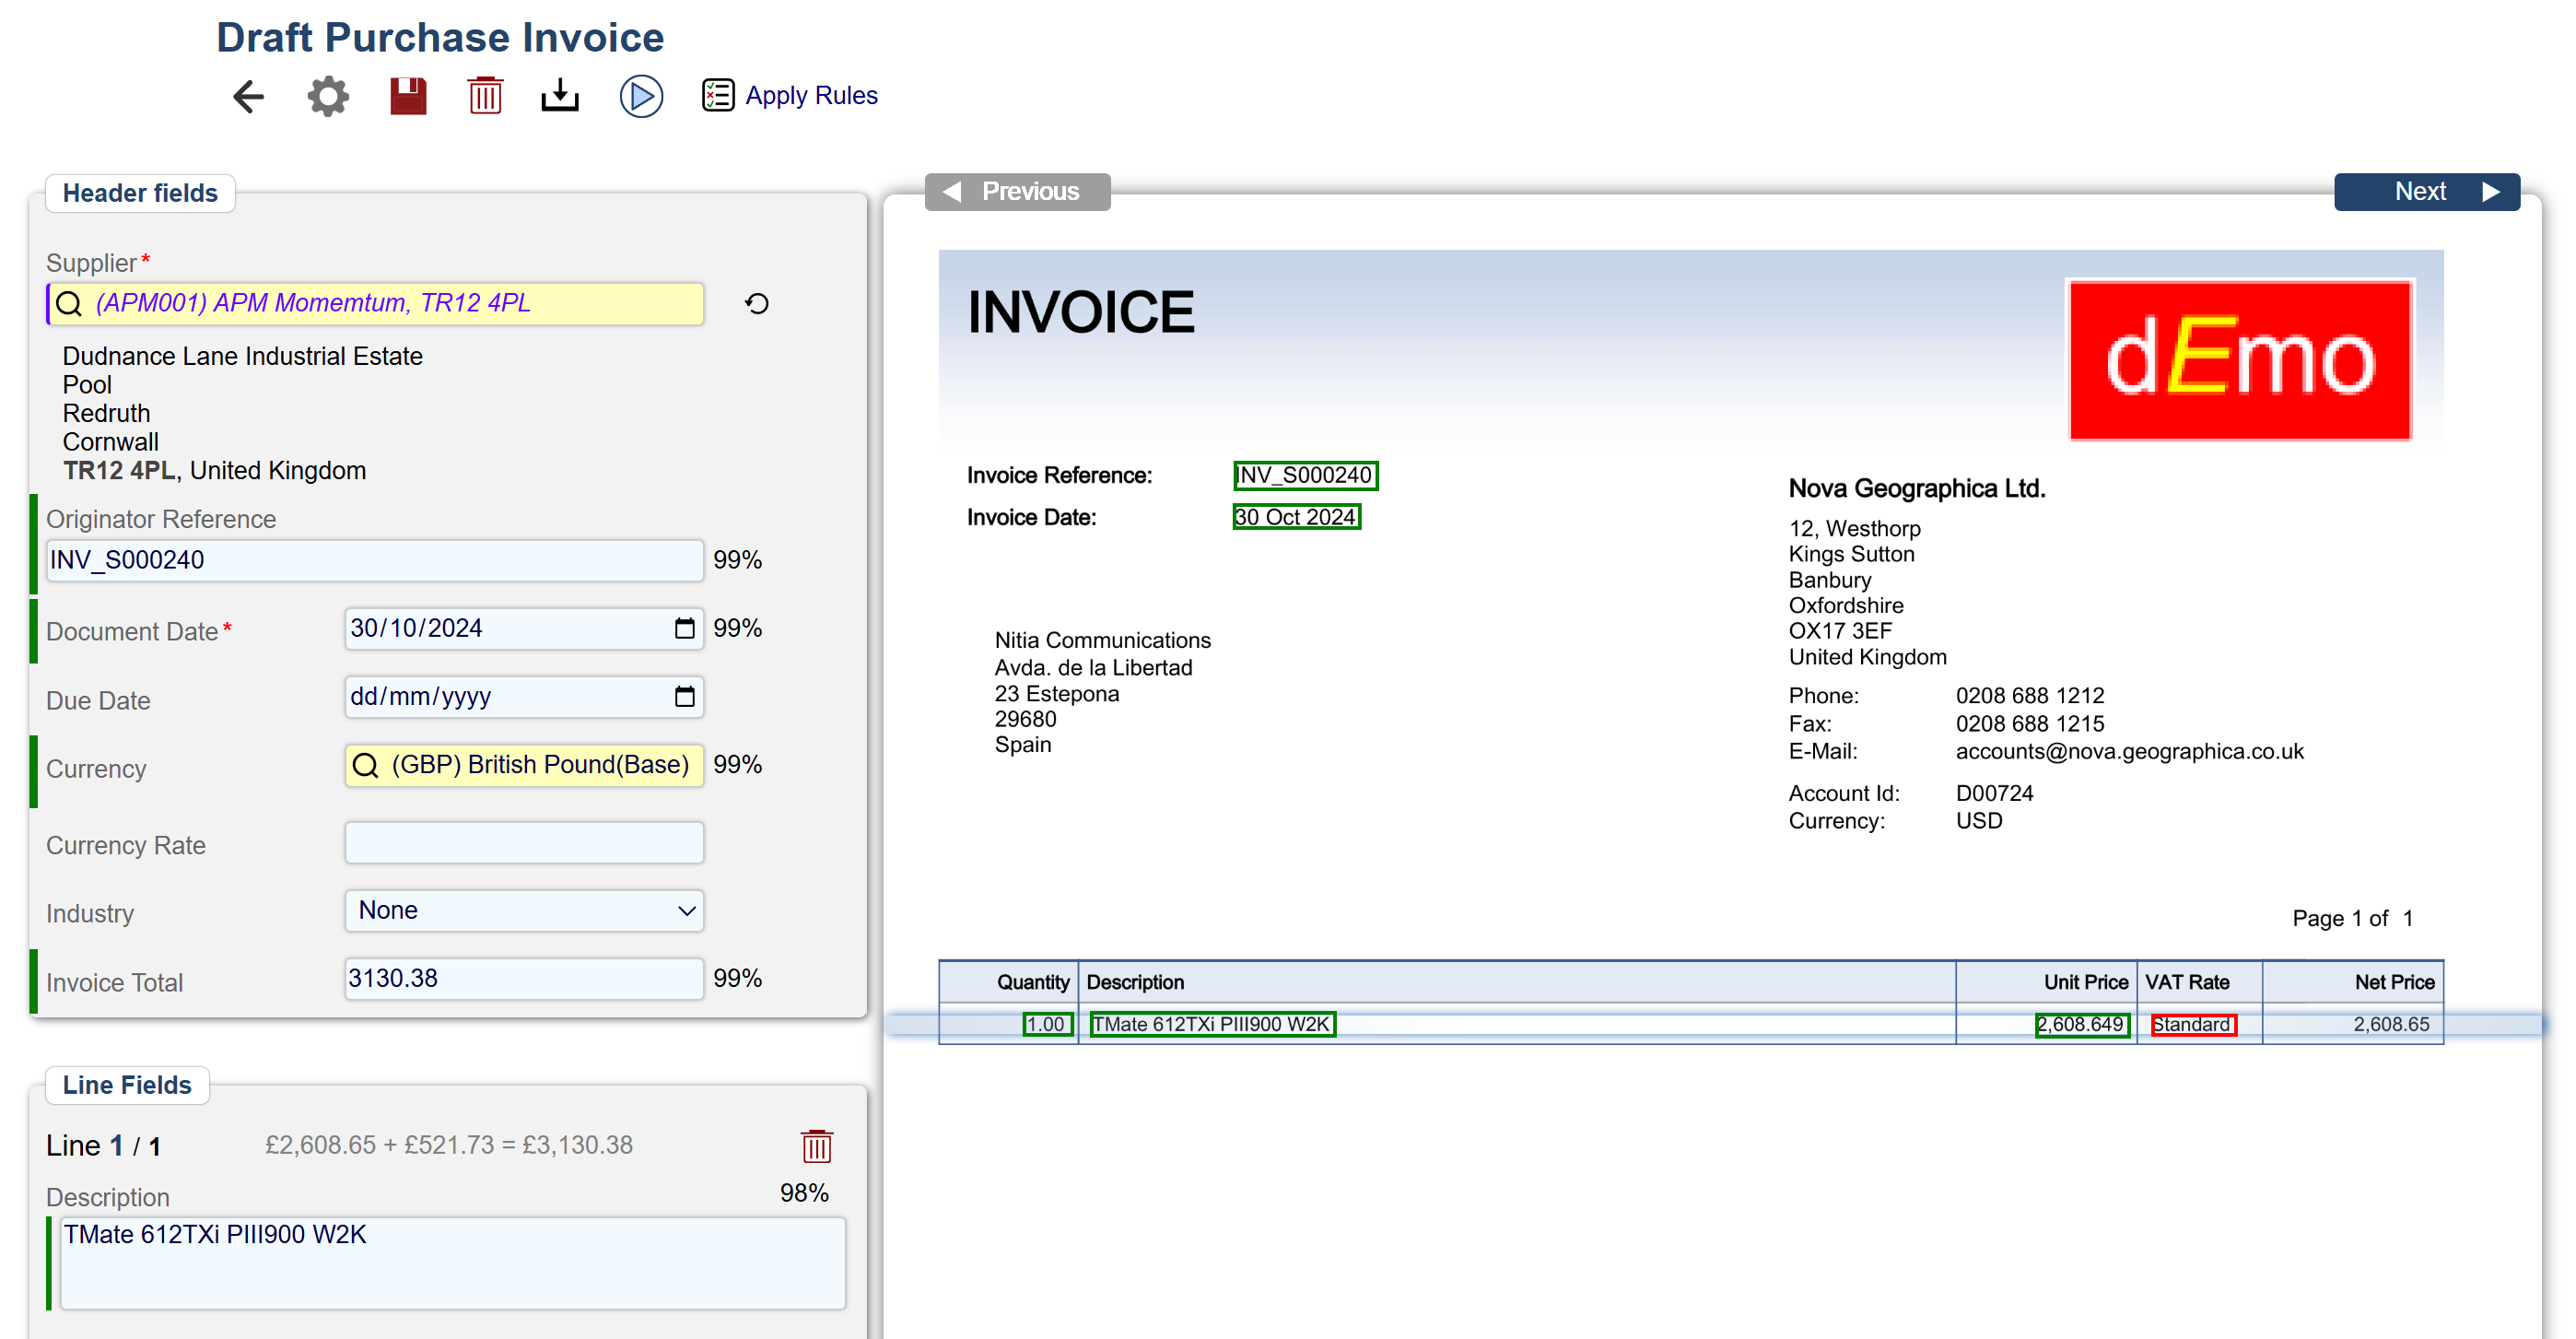
Header Fields
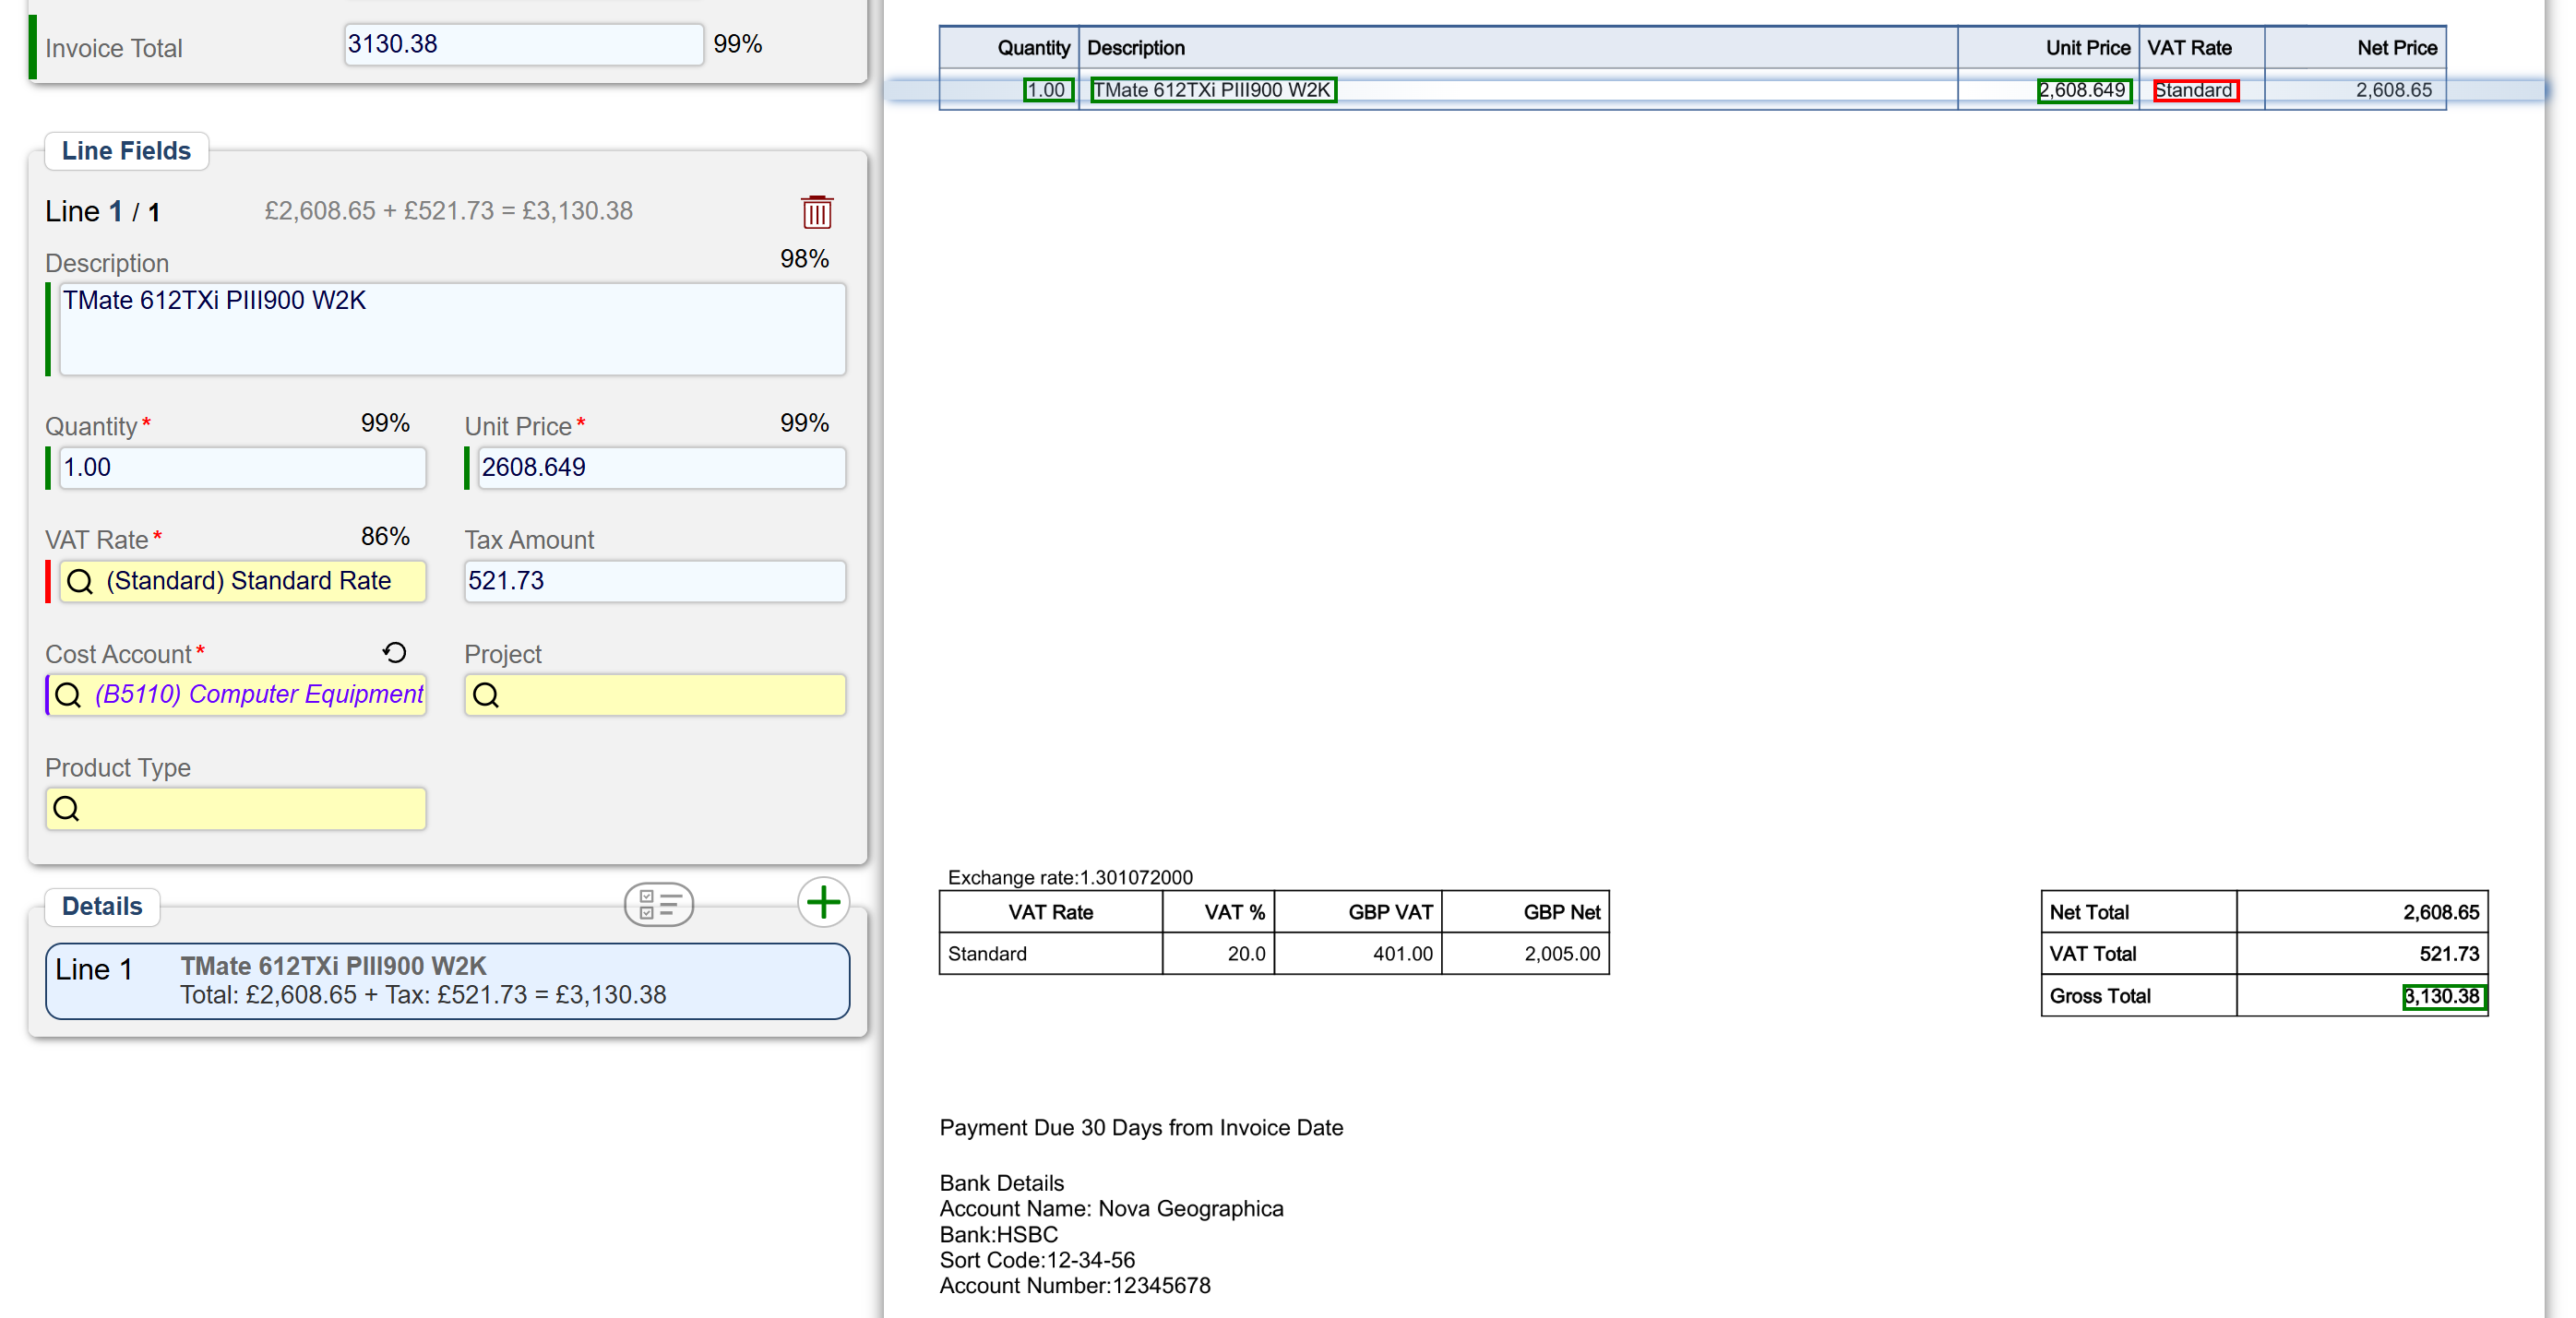
Line Fields
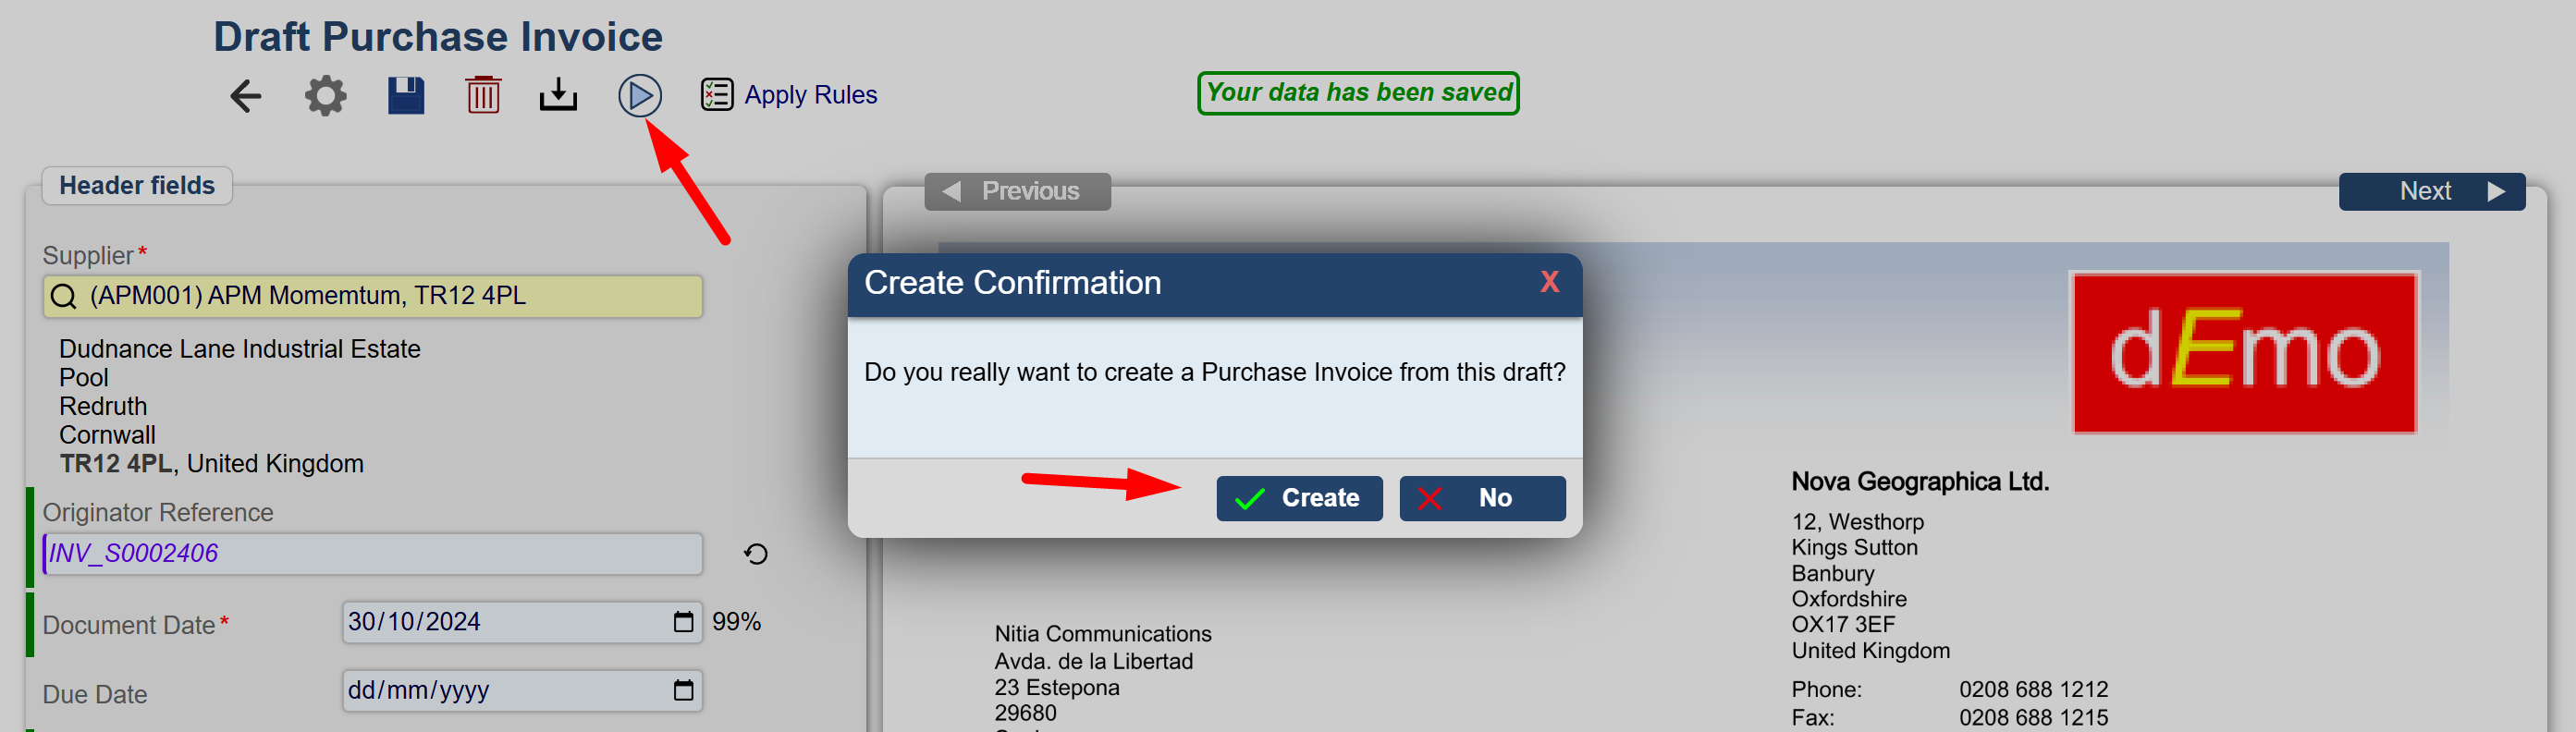
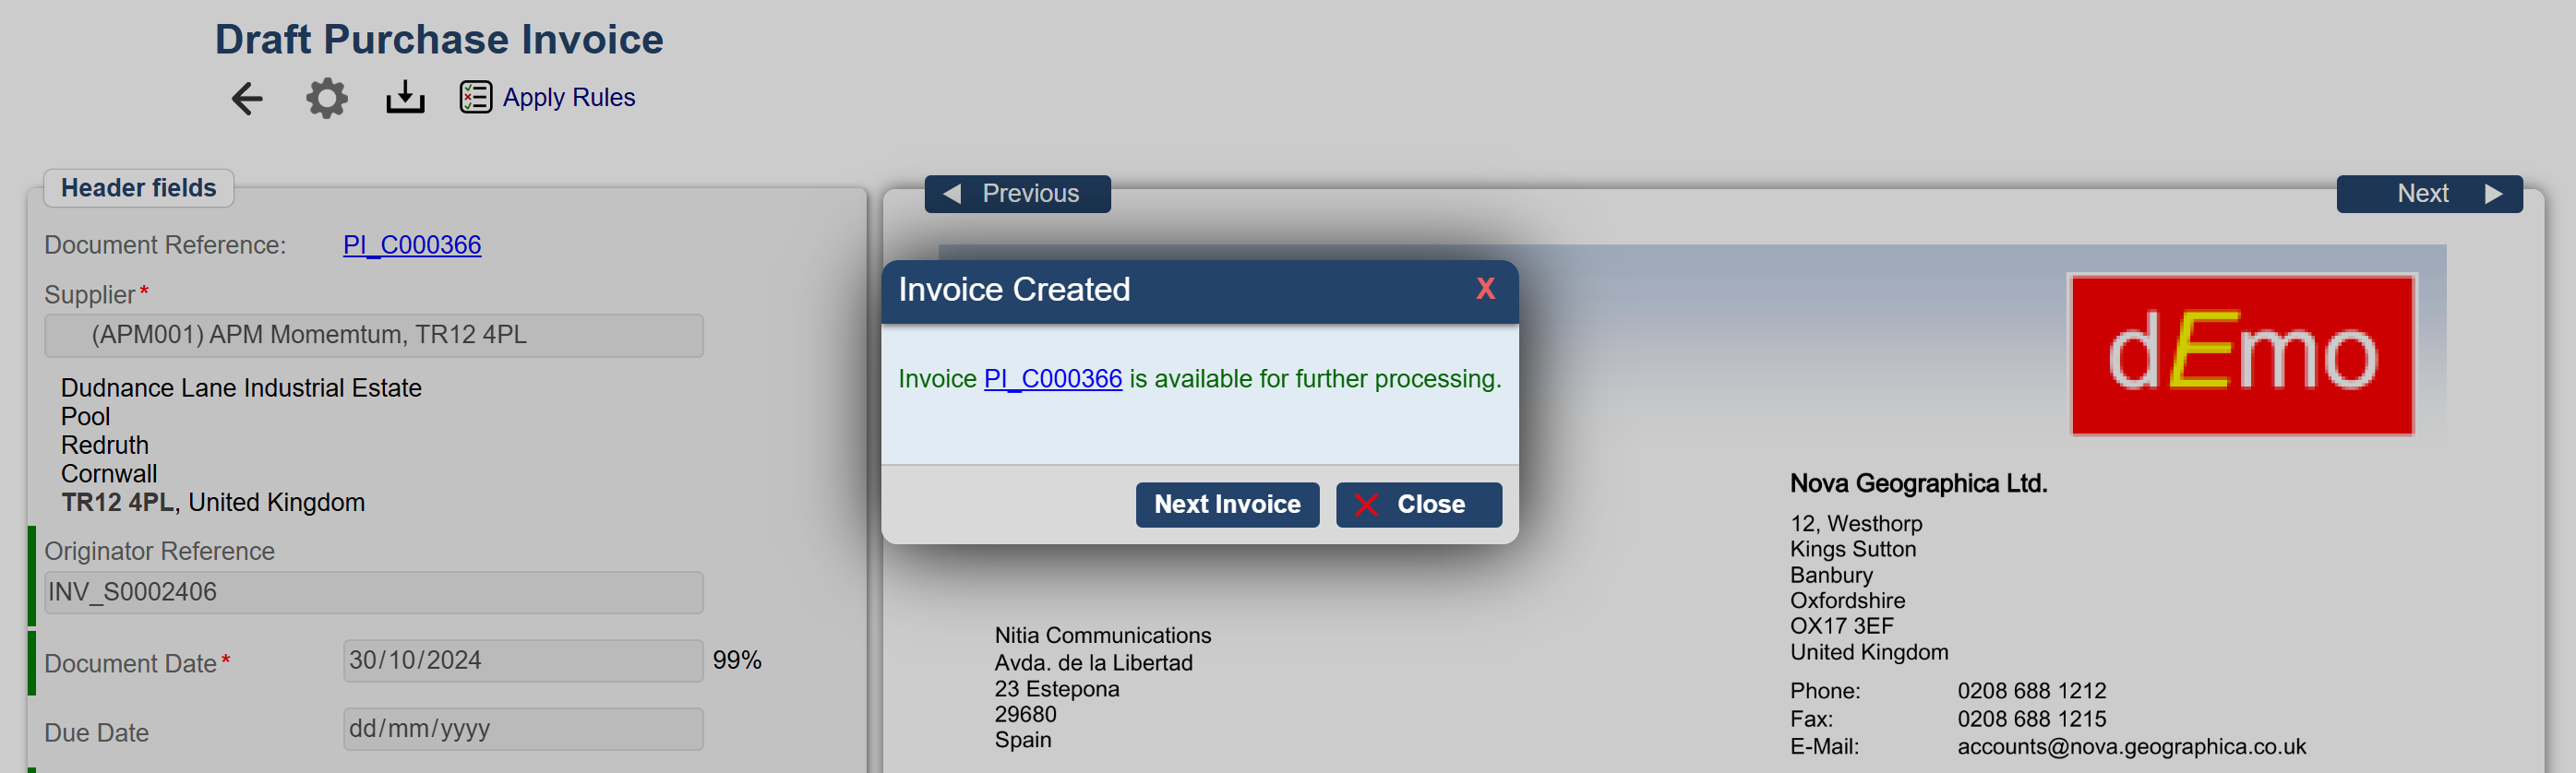
Step 5: Process the Invoice
Once all required fields are complete and correct:
Click: Process (Play button)
You will be prompted to confirm.
Select: Create
The system will:
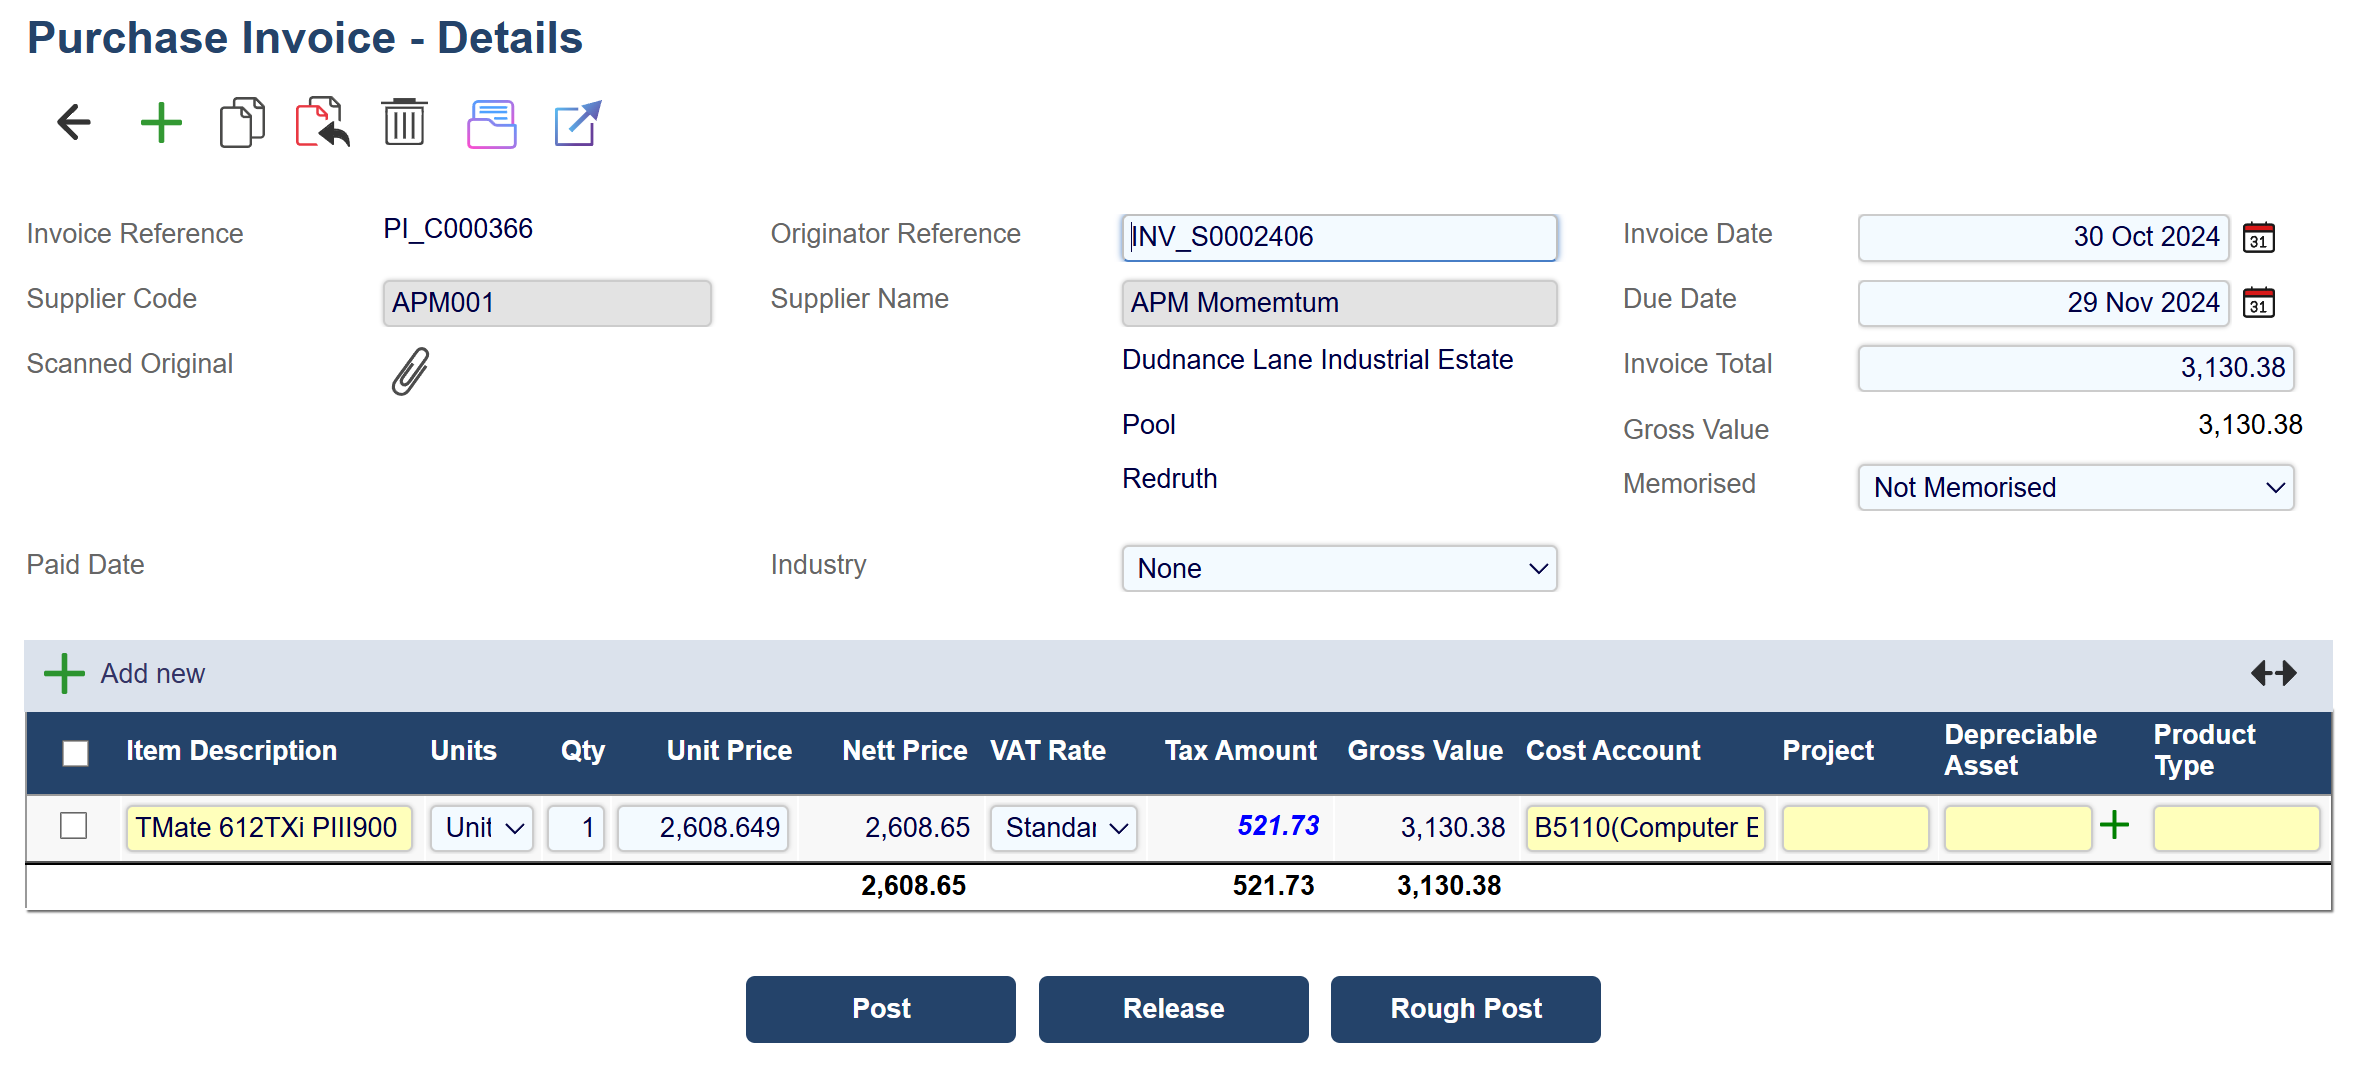
Generate a Purchase Invoice
Assign a document reference number
Store it under Documents > Purchase Invoices
Clicking the
Document Reference number directs you to the Purchase Invoice
The invoice will be created in an Entered state, meaning you can still:
Edit
Release
Post
Delete if needed
Step 6: Handle Errors (If Any)
If something is missing or incorrect, the system will show an error.
Common issues:
Required fields are missing
Supplier not identified
Custom attributes not completed
Fix the issue in the Draft Editor, then process again.
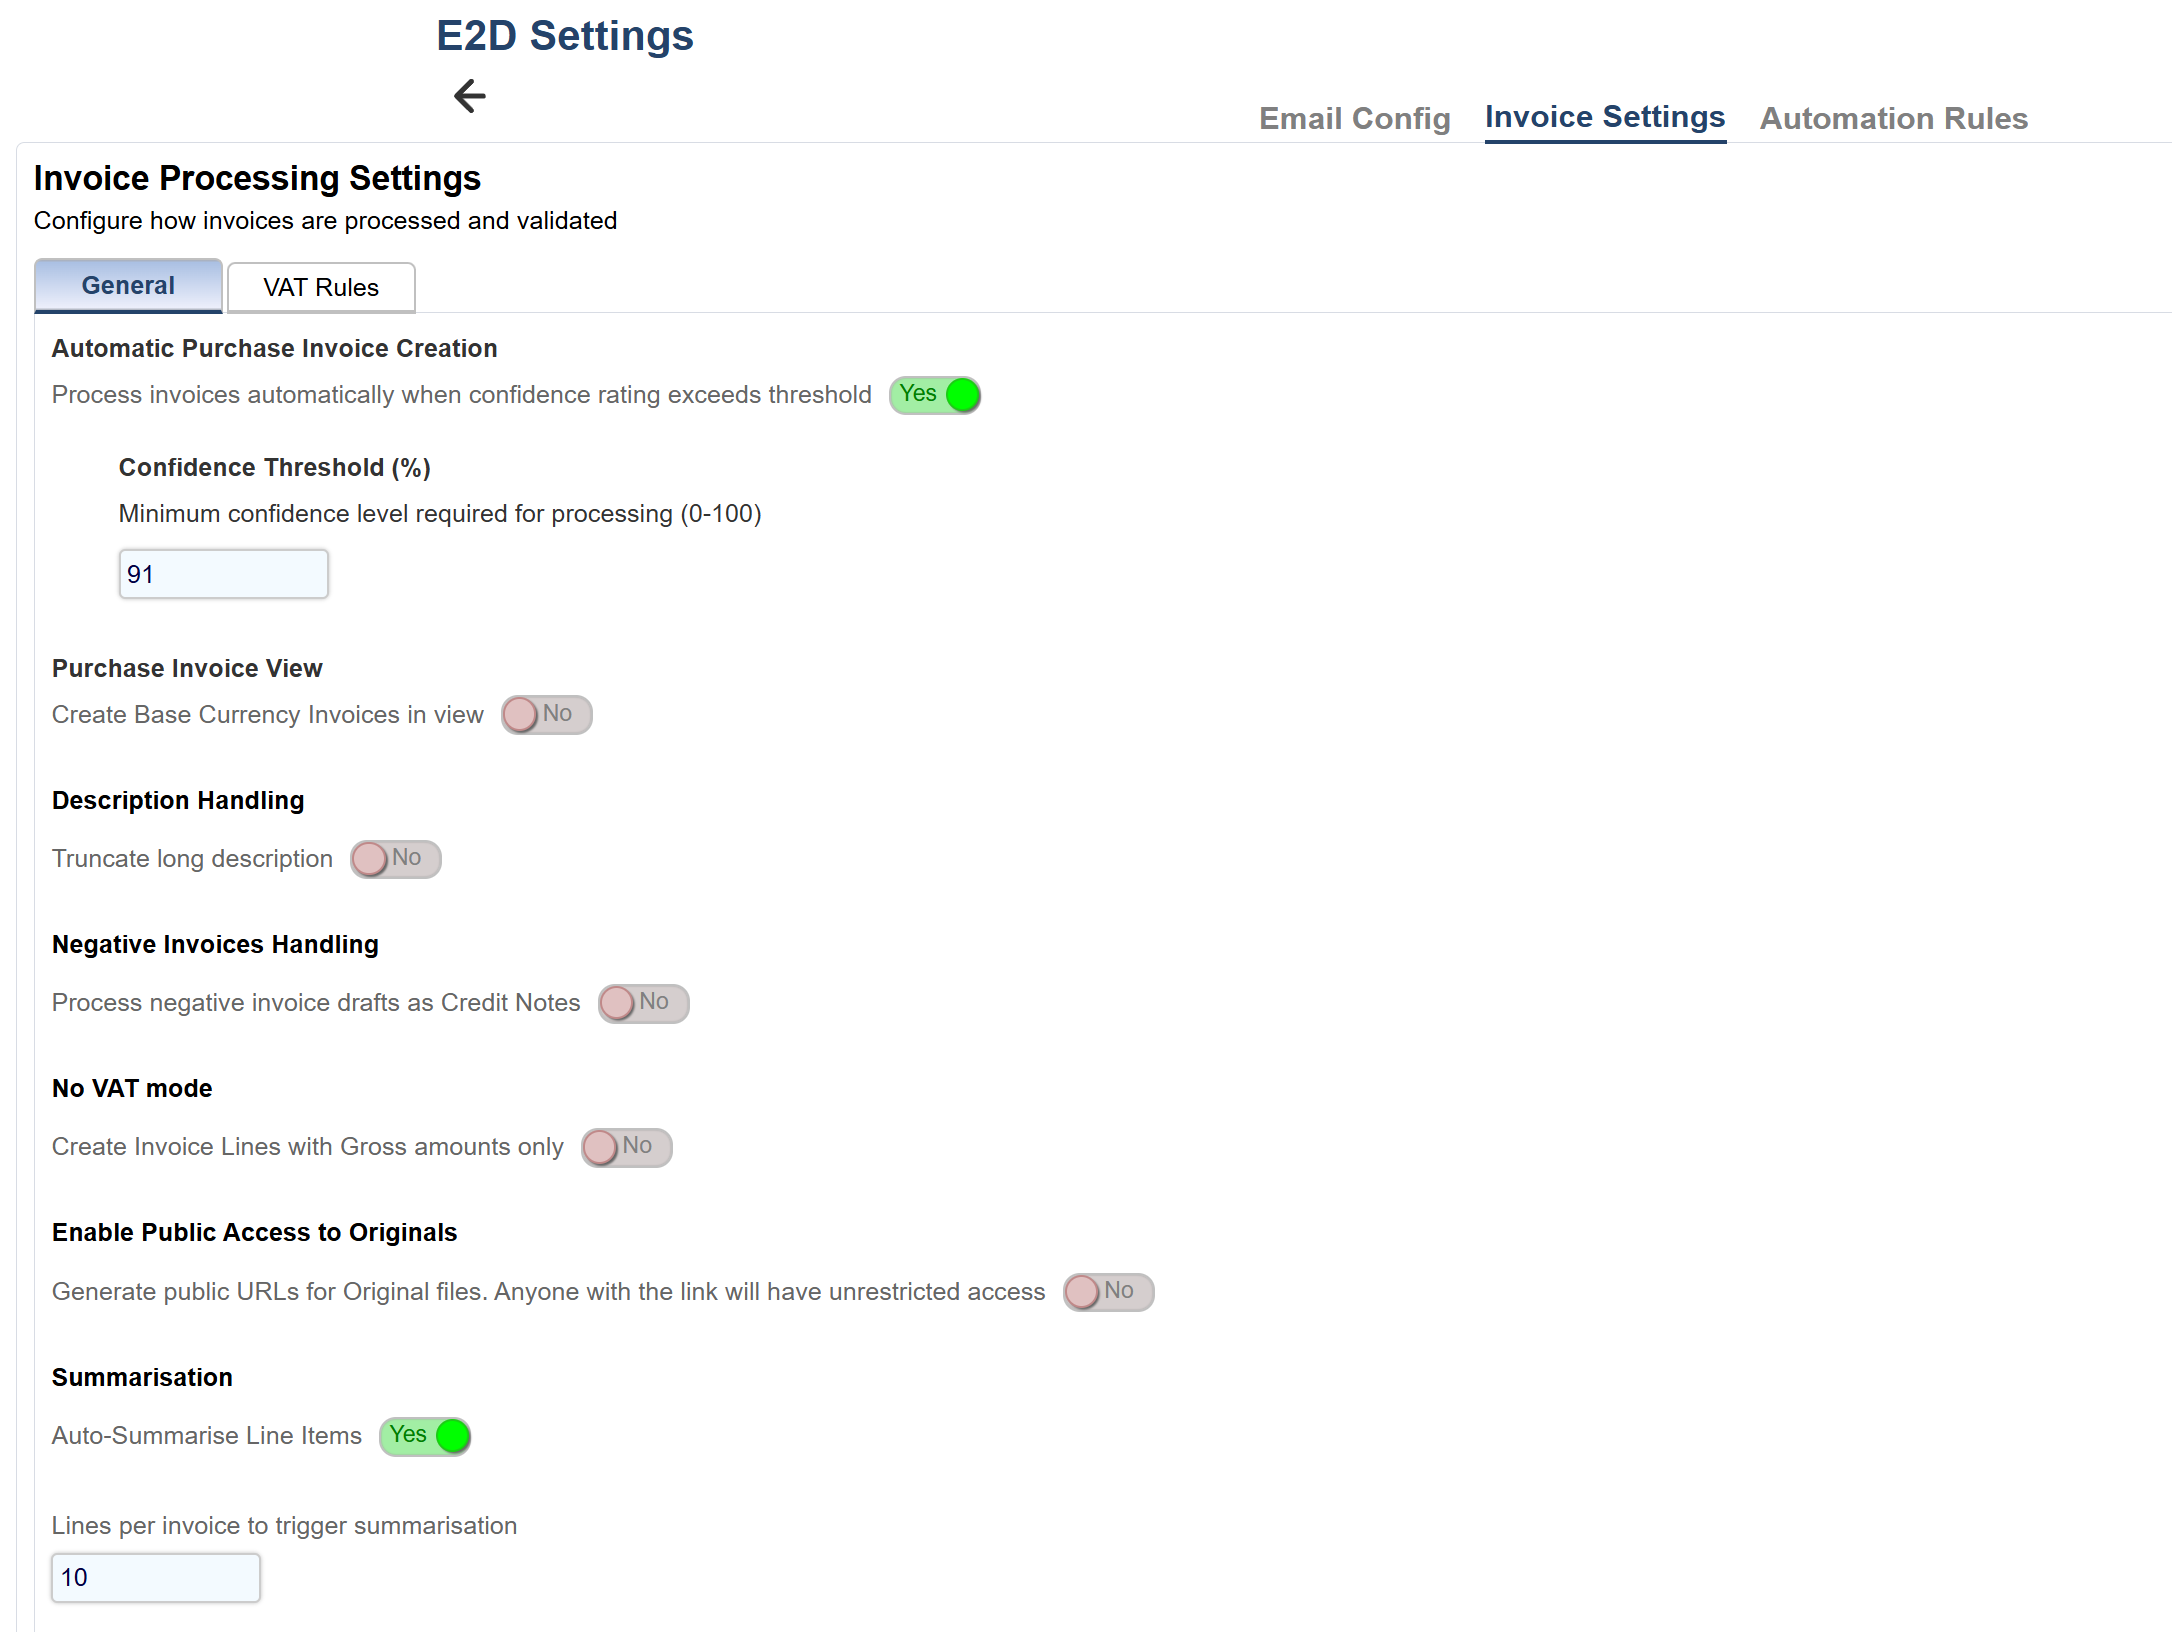
Step 7: Optional Automation and Settings
You can further improve efficiency with system settings.
Automatic Processing
You can set a confidence threshold so invoices are automatically processed if accuracy is high enough.
Example:
If all fields are above 90 percent confidence, the invoice skips manual review.
VAT Handling Options
You can control how VAT is calculated when not clearly provided:
Adjust VAT in last line
Add a VAT discrepancy line
Create separate VAT lines
Description Handling
Automatically trim long descriptions so invoices can still process.
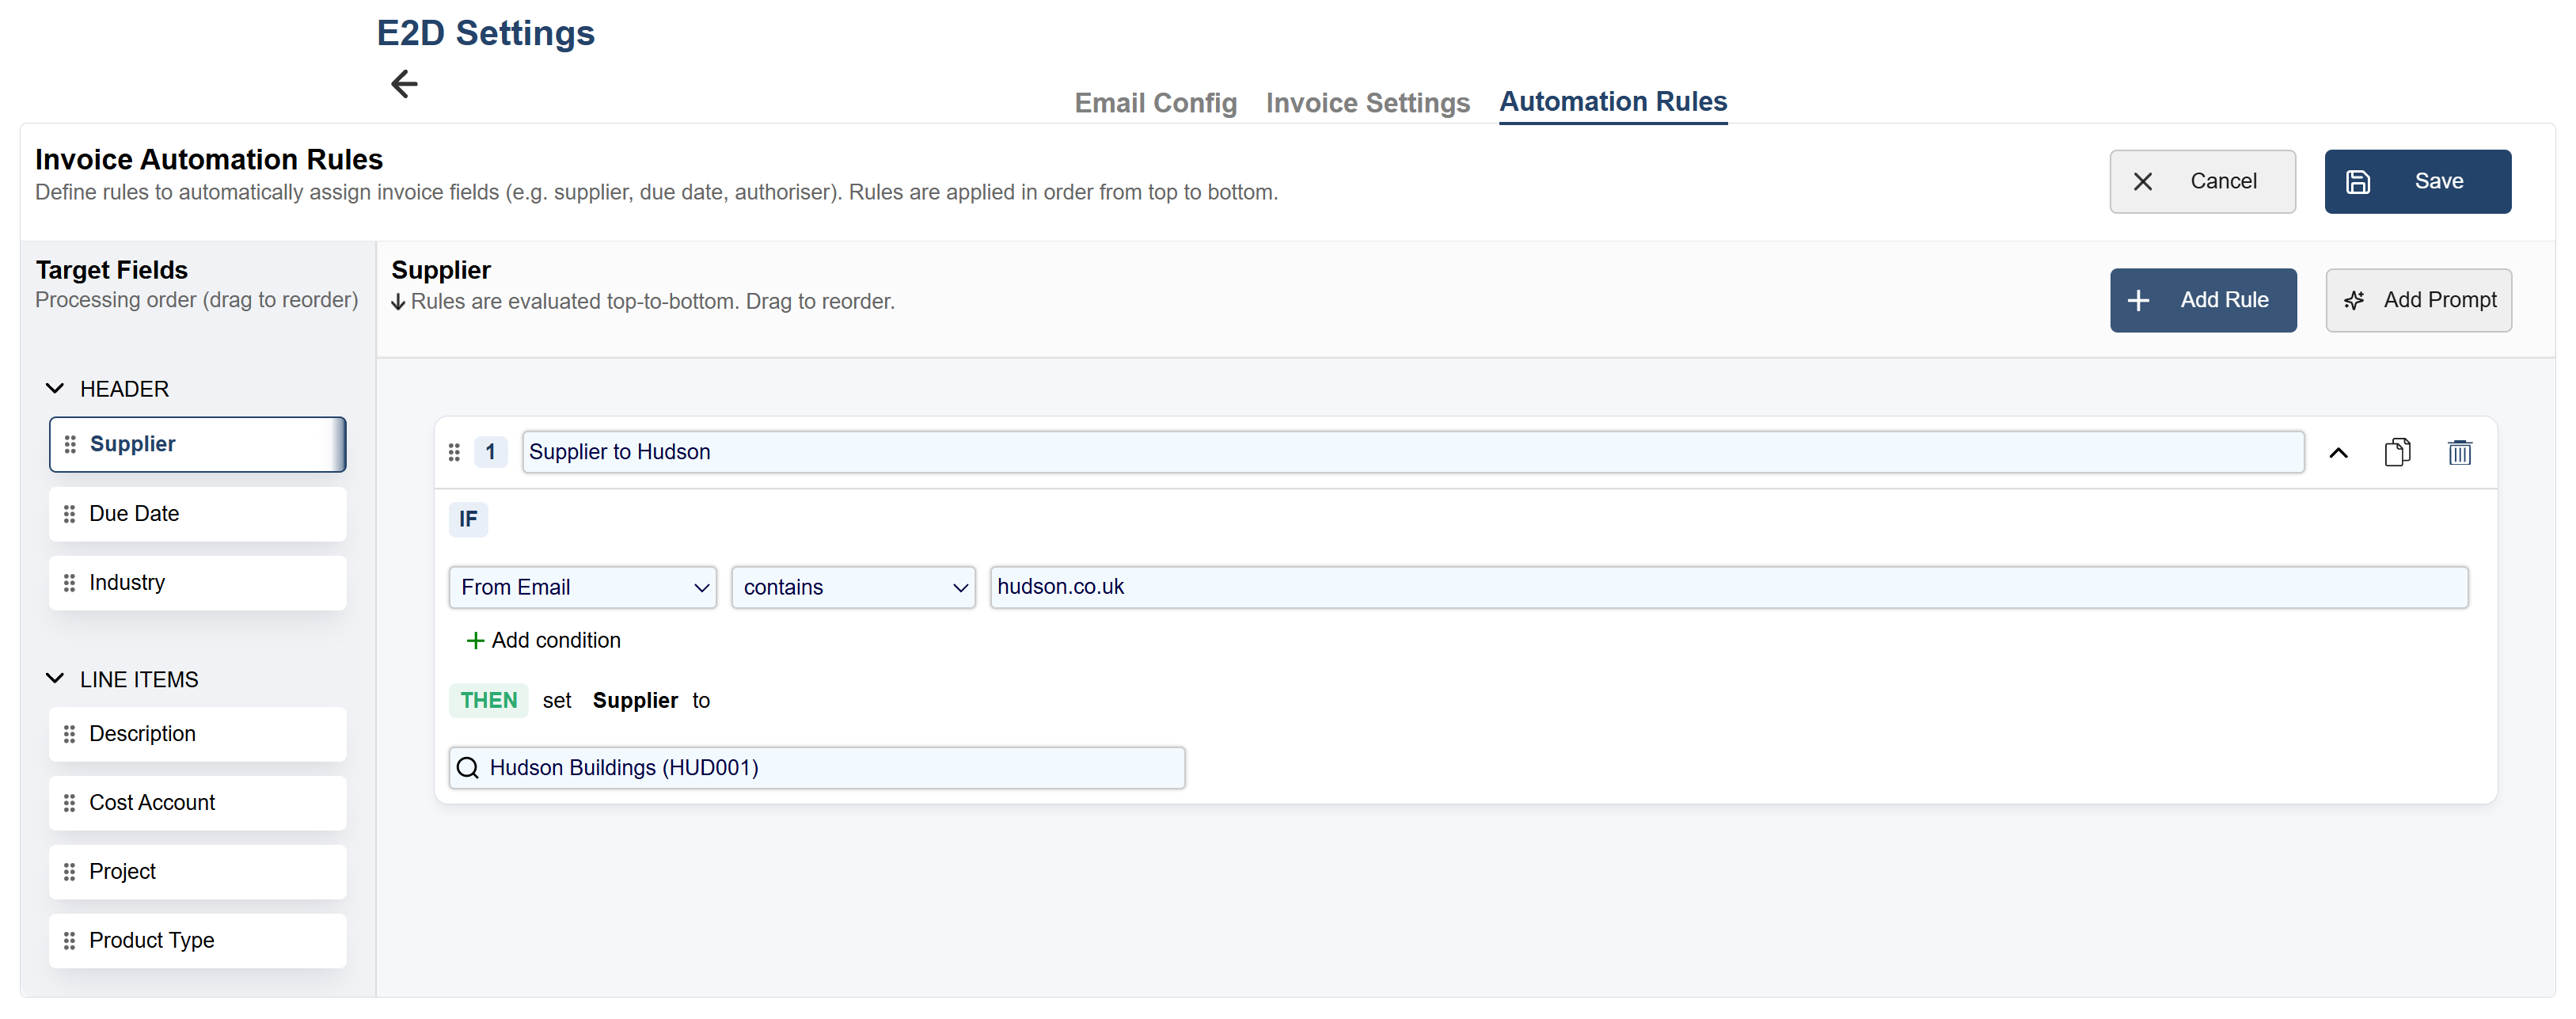
Step 8: Use Automation Rules (Optional but Powerful)
Automation rules help reduce manual work.
They allow you to automatically populate fields based on conditions.
Example:
If sender email contains “hudson.co.uk”
Then set Supplier = Hudson Buildings
You can apply rules to:
Supplier
Header fields
Line fields
Projects
Custom attributes
This ensures consistency and speeds up processing.