
E2D Settings & System Configuration
Getting Started: System Configuration
Please note: Enabling E2D initiates billing. For billing details, please contact your account manager or see: https://www.aqilla.com/solutions/ai-invoice-capture-automation
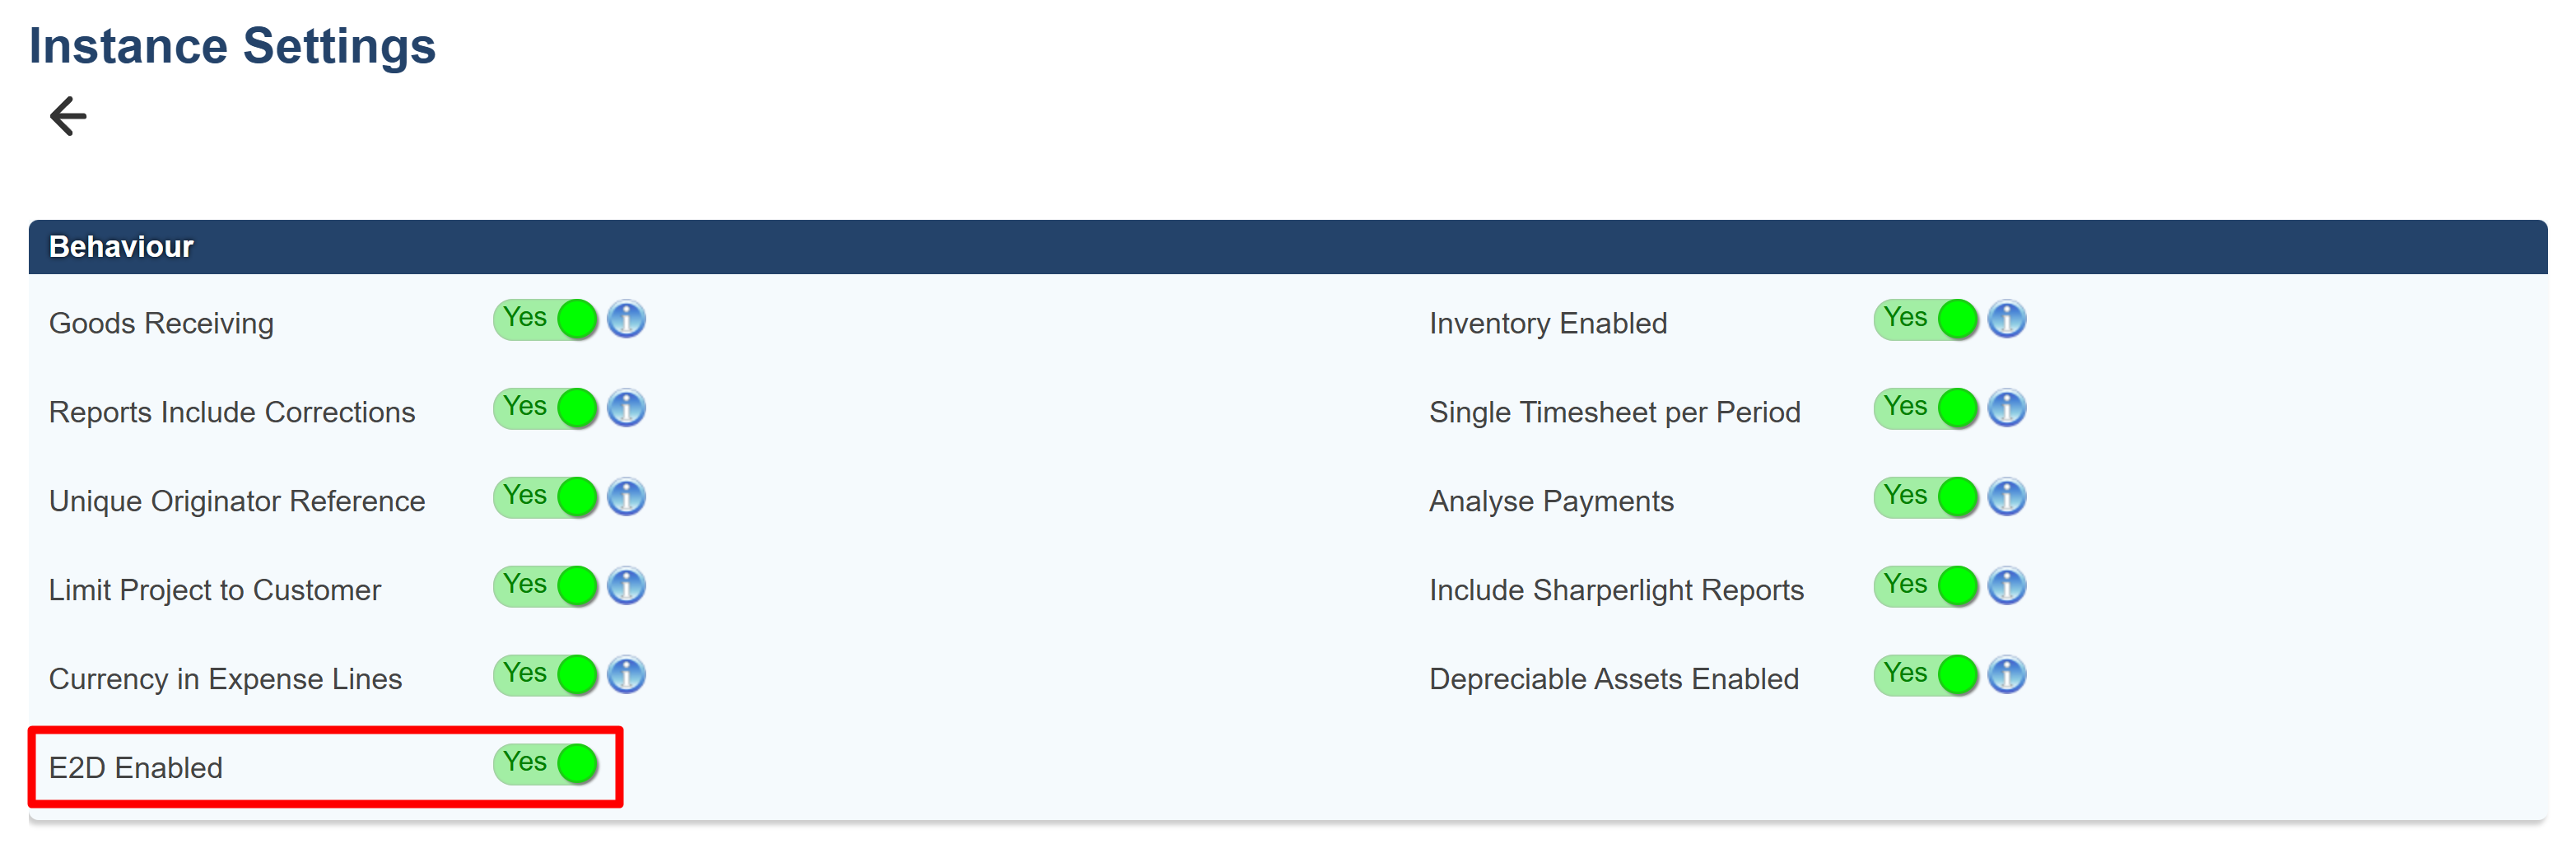
Automatic purchase invoice processing is available to all users.
To enable this feature, go to Configuration >> Instance Settings and set E2D enabled to Yes.
E2D - Invoice Settings
Go to Configuration >> E2D settings to set general invoice settings for all invoices received in this instance of Aqilla. This applies to all companies within the instance.
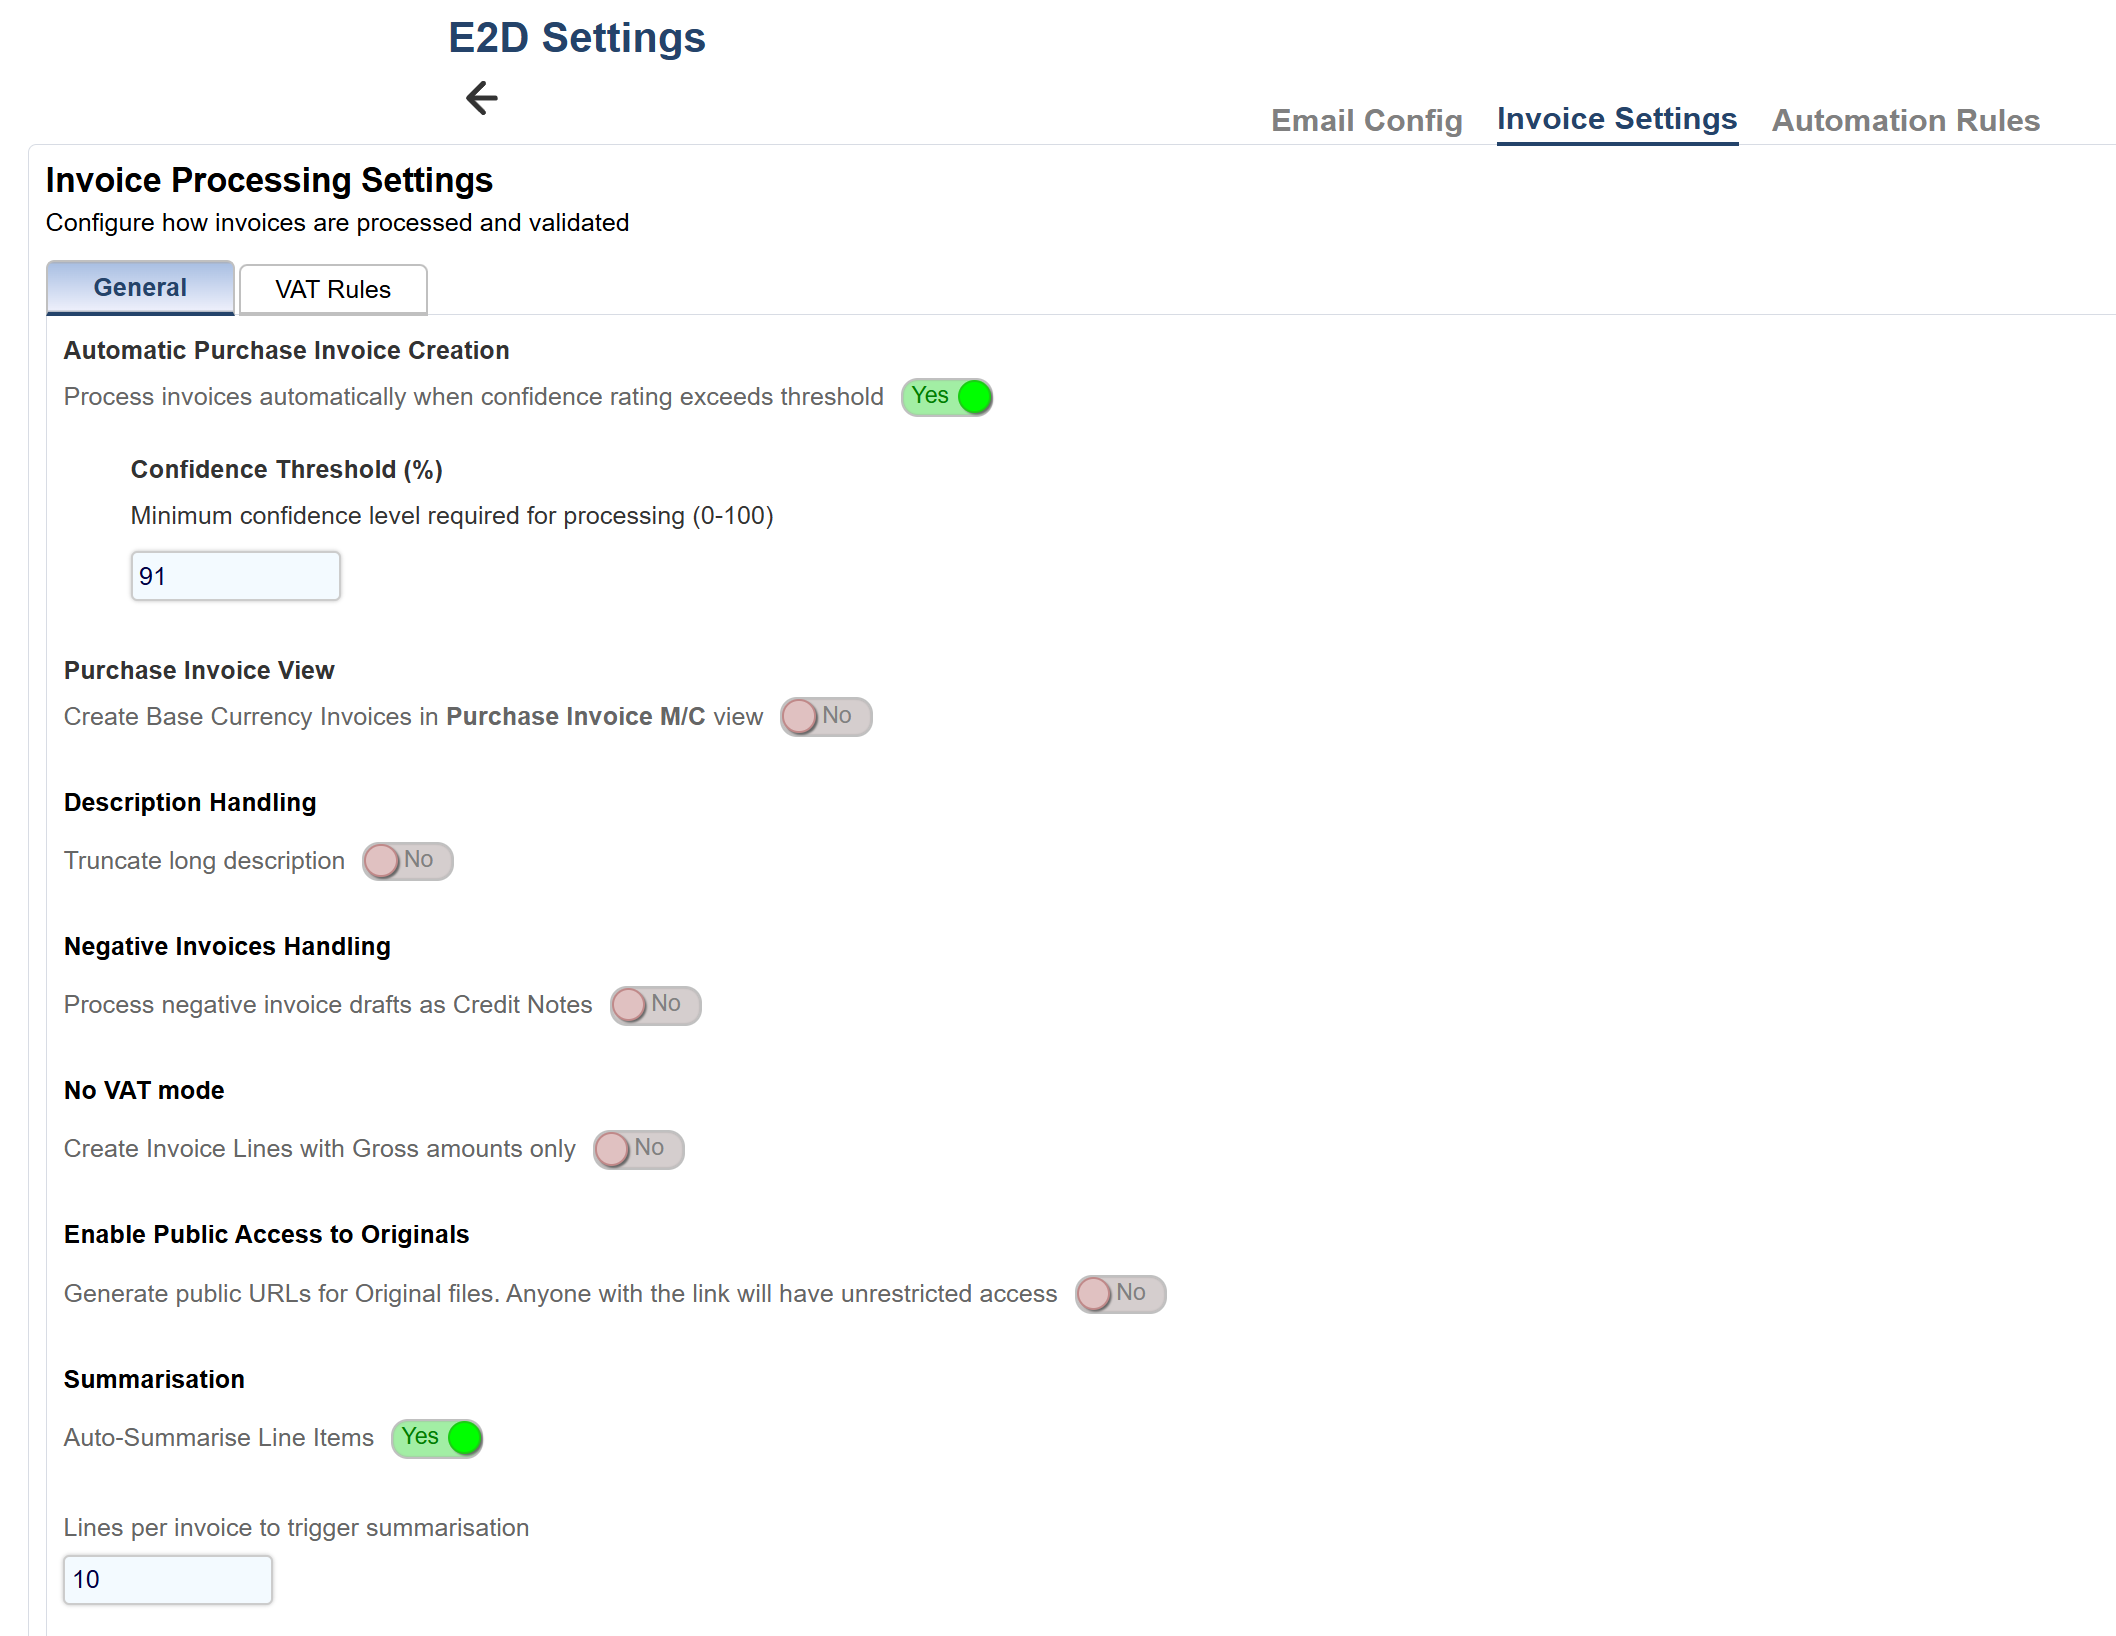
General settings:
Automatic Purchase Invoice Creation
This setting determines when an invoice can bypass the Draft Invoice review stage and go straight to the Purchase Invoice screen in the Entered state, ready for approval or rough posting.
You can set a confidence threshold to control this behavior. For example, if all extracted fields have a confidence score of 90% or higher, the invoice will be automatically marked as Processed.
Invoices that do not meet the threshold will remain in the Draft Invoice view for manual review.
If enabled: The system will automatically process draft invoices that meet or exceed the confidence threshold.
Purchase Invoice View
This toggle determines which Purchase Invoice view is used for draft invoices received in your base currency. By default, invoices in a different currency will open in the M/C (multi-currency) view. However, if your system is configured for all invoices to be processed in the M/C view, this setting will apply to base-currency invoices as well.
If enabled: Base-currency invoices will appear in Purchase Invoice M/C (or the corresponding named view) instead of the standard Purchase Invoices view.
Description Handling
If a captured description exceeds the character limit, the item can’t be auto-processed. Enable this to automatically trim the description to the maximum length.
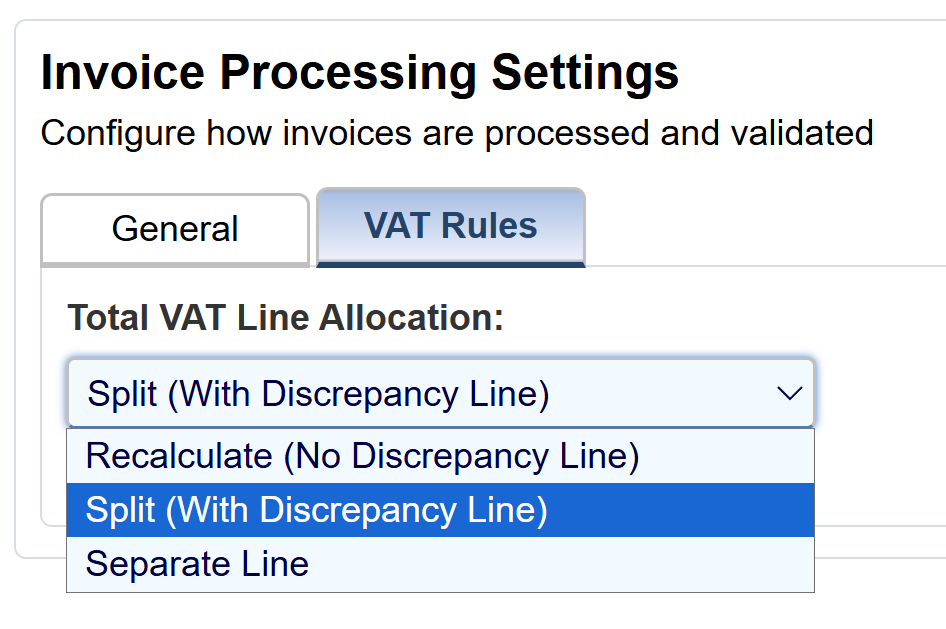
VAT Rules
When invoices don't include tax amounts for individual line items, E2D automatically calculates these using your system's VAT handling setting. By default, the system splits the total document tax proportionally across all lines based on their net values. Alternative settings allow the system to recalculate tax using the document's overall tax rate (adding a "VAT Discrepancy" line if totals don't match perfectly) or create separate VAT-only lines that show tax amounts independently.
SPLIT_NO_DISCR - (Adjust VAT in last line) Any small rounding differences that occur during this calculation are automatically added to the last line to ensure the total matches exactly.
RECALC_WITH_DISCR - (Add VAT discrepancy line) If the sum of these individual calculations doesn't equal the document's total VAT amount, the system automatically creates an additional "VAT Discrepancy" line to account for the difference, ensuring the invoice balances correctly.
VAT_LINES - (Move all VAT to a single line) Sets all line items to zero VAT and creates separate VAT-only lines showing the tax amounts.
Email Configuration
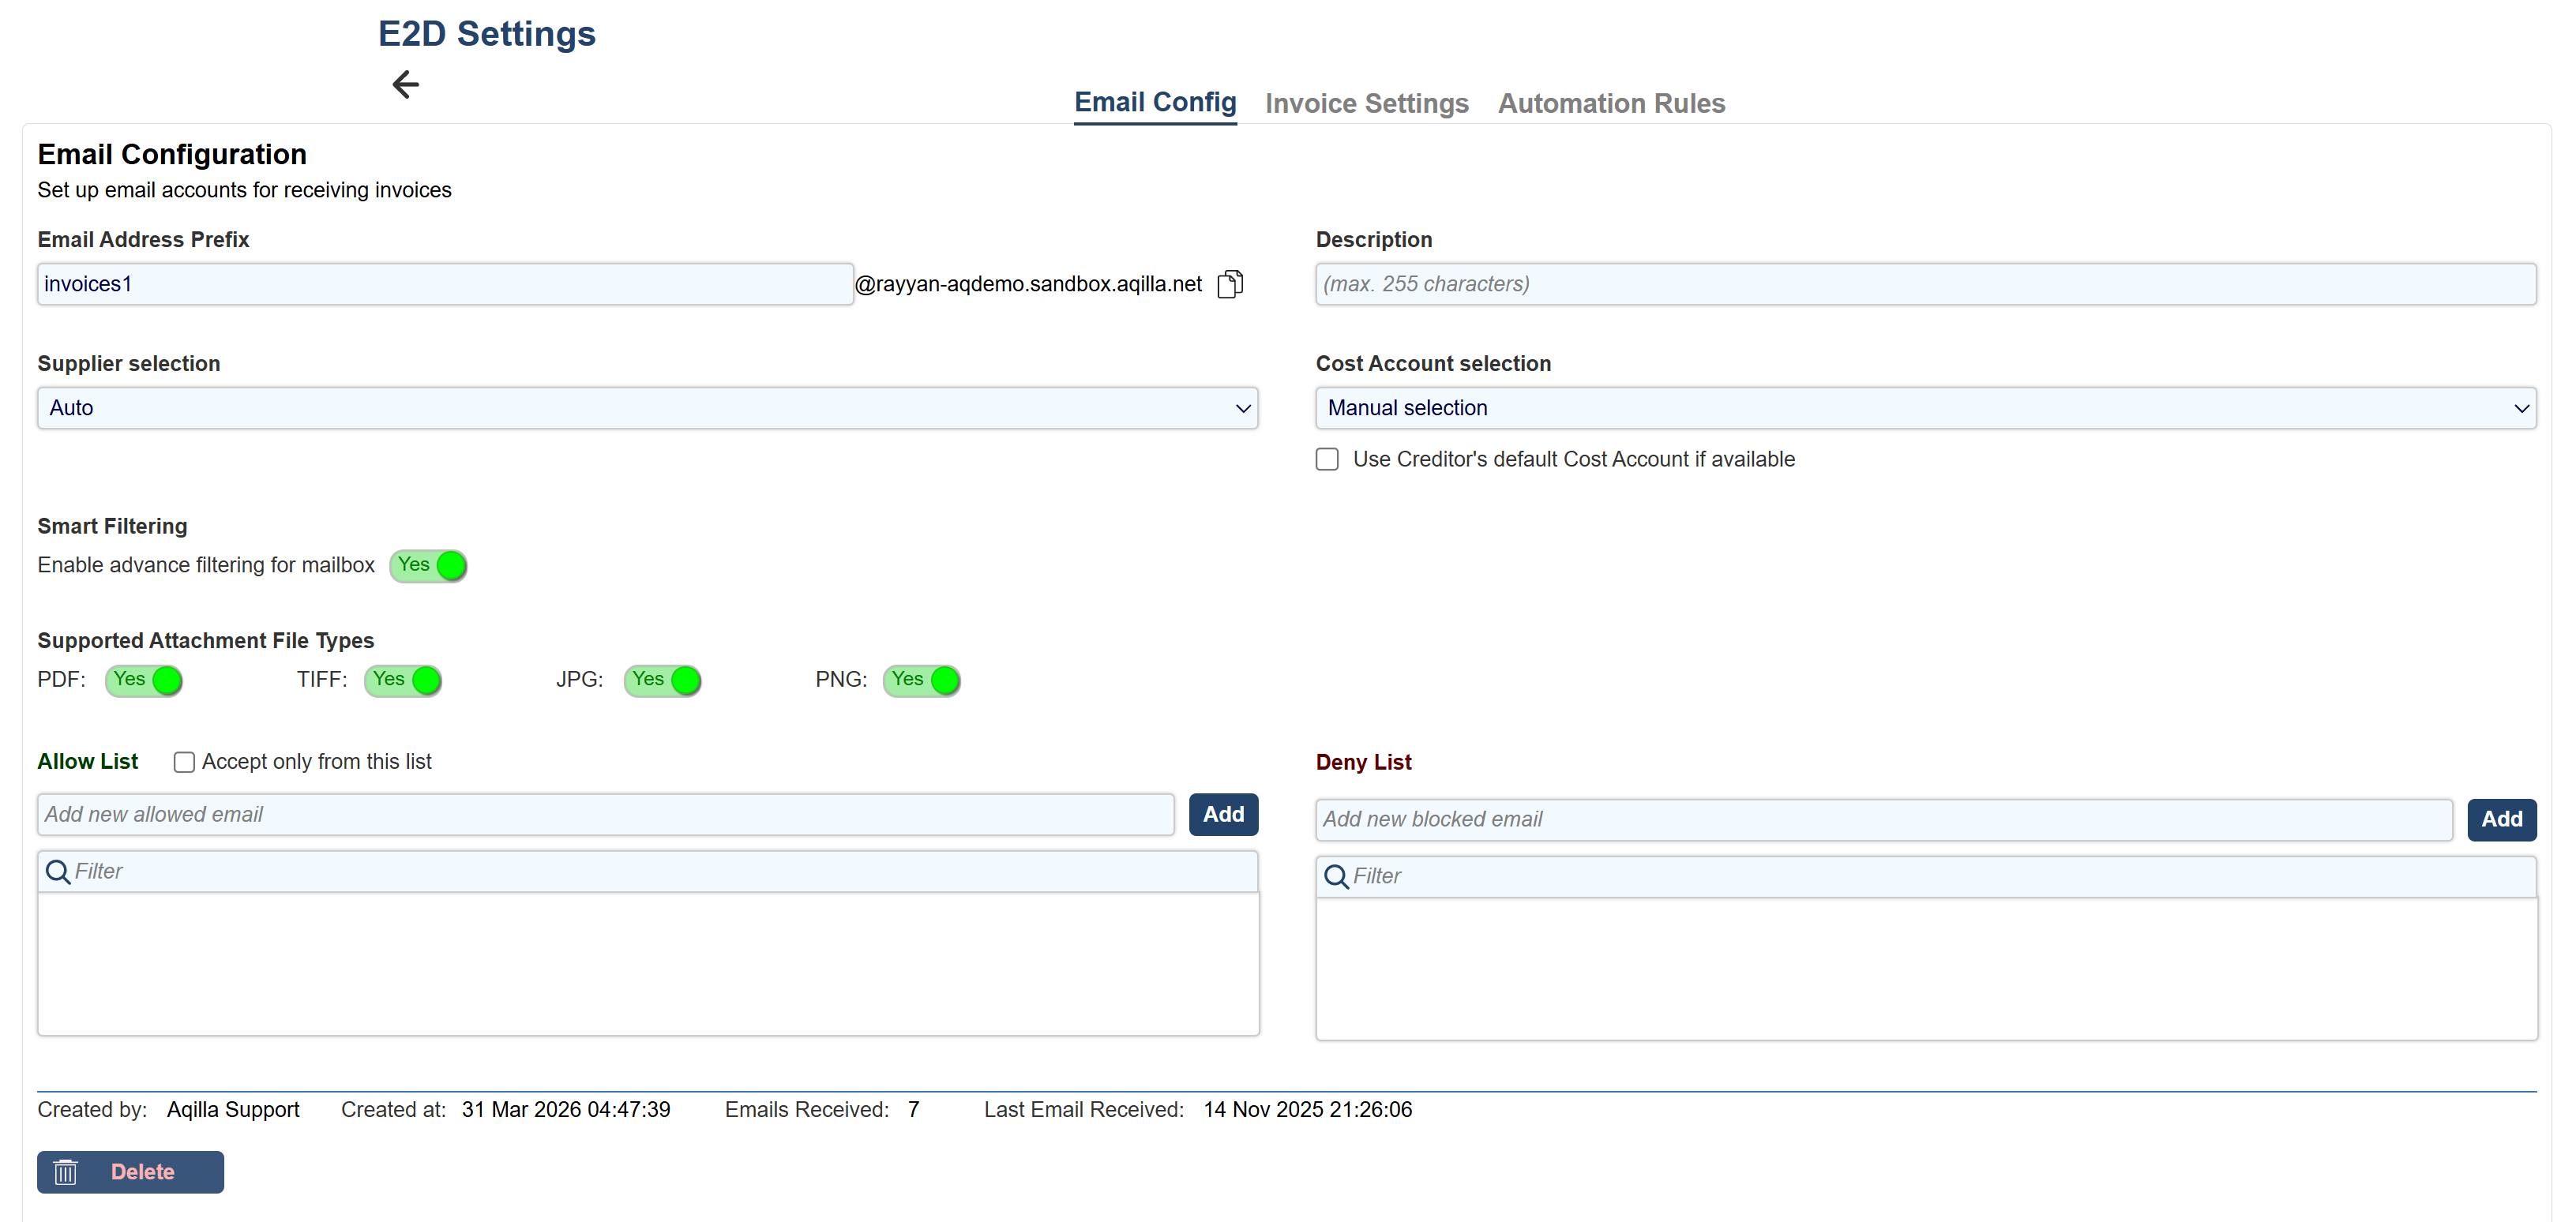
The Settings Menu gives you the option to set up an email account for suppliers to send in their purchase invoices.
Navigate to Configuration > E2D Settings.
You’ll see an empty Email Configuration page by default.
Click Create New Email Inbox.
After clicking the button, the Email Account settings will appear, presenting various behaviors and options for configuring your new inbox. One important setting is the email address prefix, which determines the name before the @ symbol. By default, a random name is generated, but you can modify it to something meaningful, such as invoices, purchases, or accounts.
Additionally, keep in mind the naming convention after the @ symbol: it will include your specific instance name followed by .aqilla.net.
For example, if you choose the prefix invoices and designate your instance as Demo, your resulting email address will be:
Suppliers sending invoices to this address will have their communications automatically directed to your Purchase Invoice inbox, simplifying the management of incoming invoices.
Field Name | Description |
Email Address Prefix | Create a distinctive prefix that can't be easily replicated by malicious users trying to impersonate or interfere with the system. |
Description (Optional) | Optional description of the purpose of the inbox. |
Smart Filtering (Default on) | Additional filtering |
Supported attached files types | Click to enable the following file formats: PDF (default on), TIFF, JPG & PNG: |
Allow list | List of email addresses that can send to this inbox *option to limit the recipients to allow list only |
Deny List | List of emails that will be blocked and not processed by this inbox. |
Automation Rules:
Overview
Automation rules can be applied to the E2D draft purchase invoice page. When a purchase invoice is received and appears in the inbox, these rules are automatically evaluated and applied.
Automation rules are used to control how invoice fields are populated within Aqilla. By defining a set of conditions, the system can automatically complete specific fields when those conditions are met.
This reduces manual input, improves consistency, and ensures that invoices are processed in line with predefined rules.
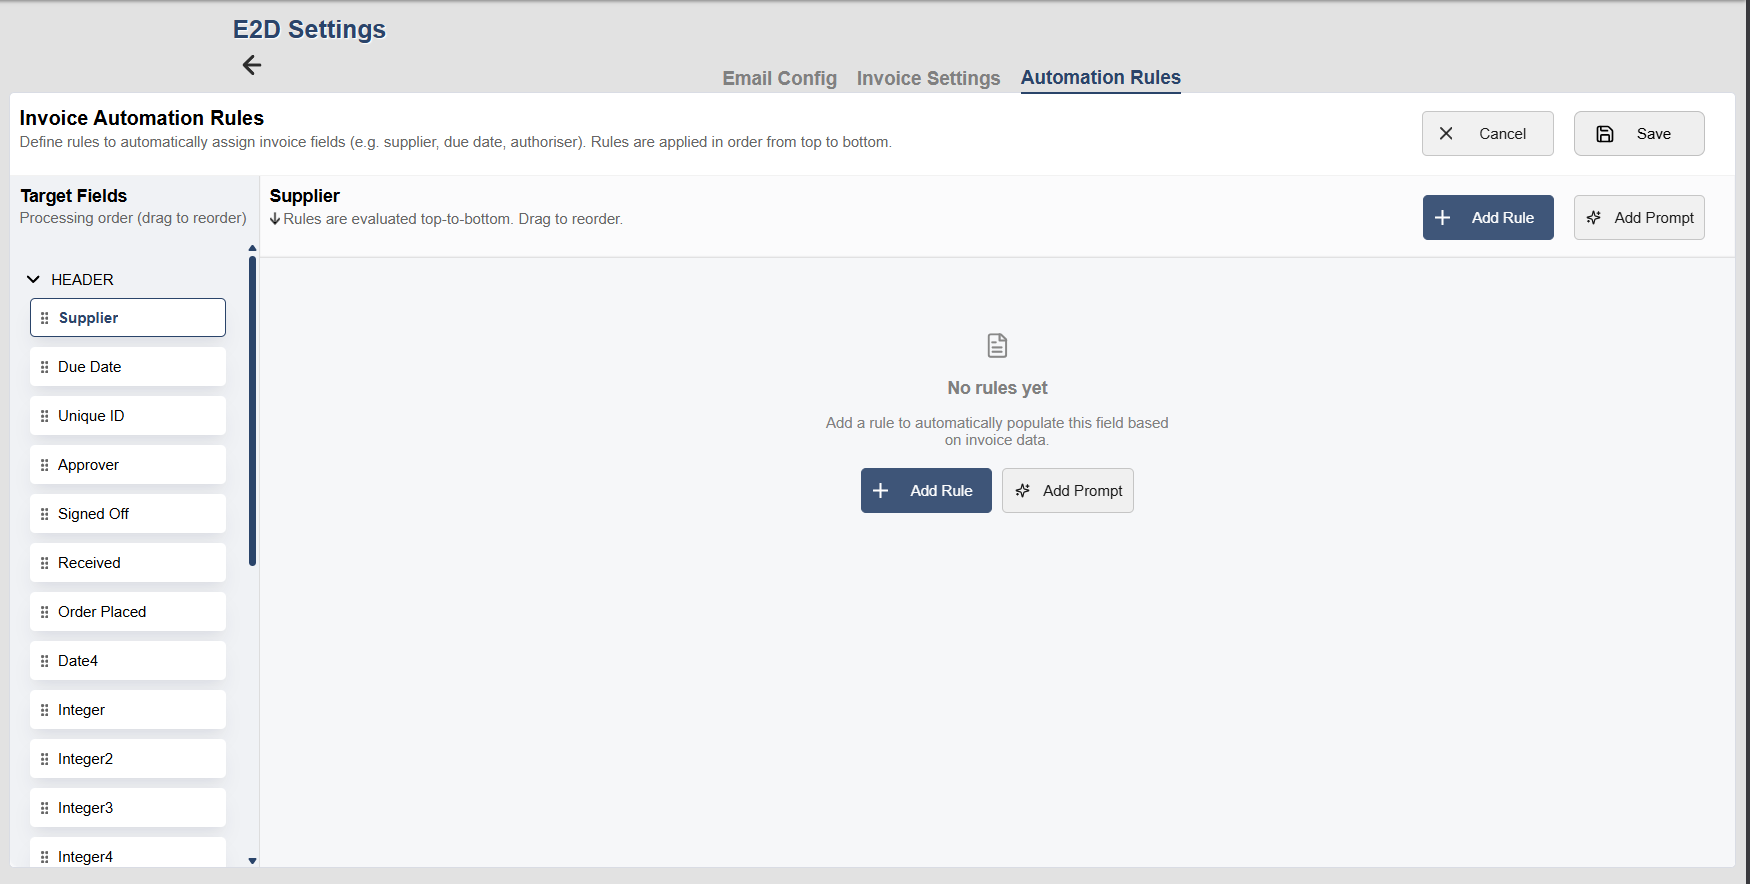
Screen Layout
The Automation Rules screen is divided into two main sections.
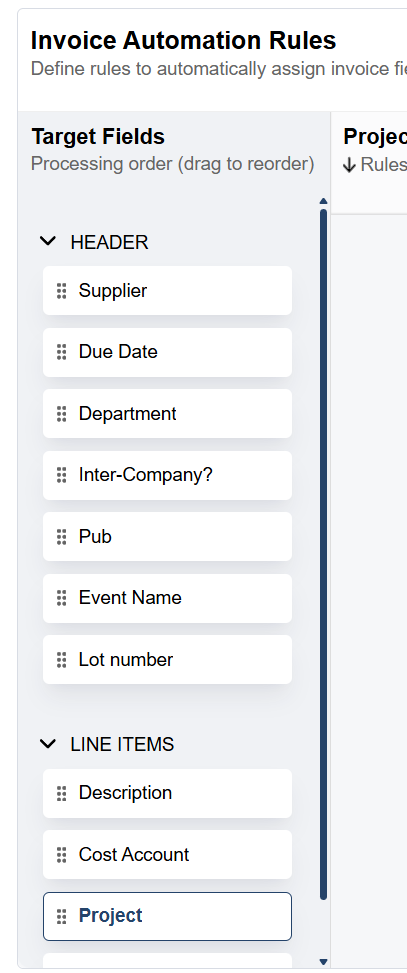
Target Fields (left-hand side) – used to select the attribute you want to control
Rules configuration (right-hand side) – used to define the conditions and outcomes
Target Fields represent the fields that will be updated when a rule is triggered.
For example, you may want to assign a specific supplier based on the sender’s email address or the subject of the invoice email.
Creating an Automation Rule
To create a rule:
Select the required field from the Target Fields list (for example, Supplier)
Click Add Rule
Enter a description (optional, but recommended for clarity)
Define the condition that will trigger the rule
Set the value that should be applied when the condition is met
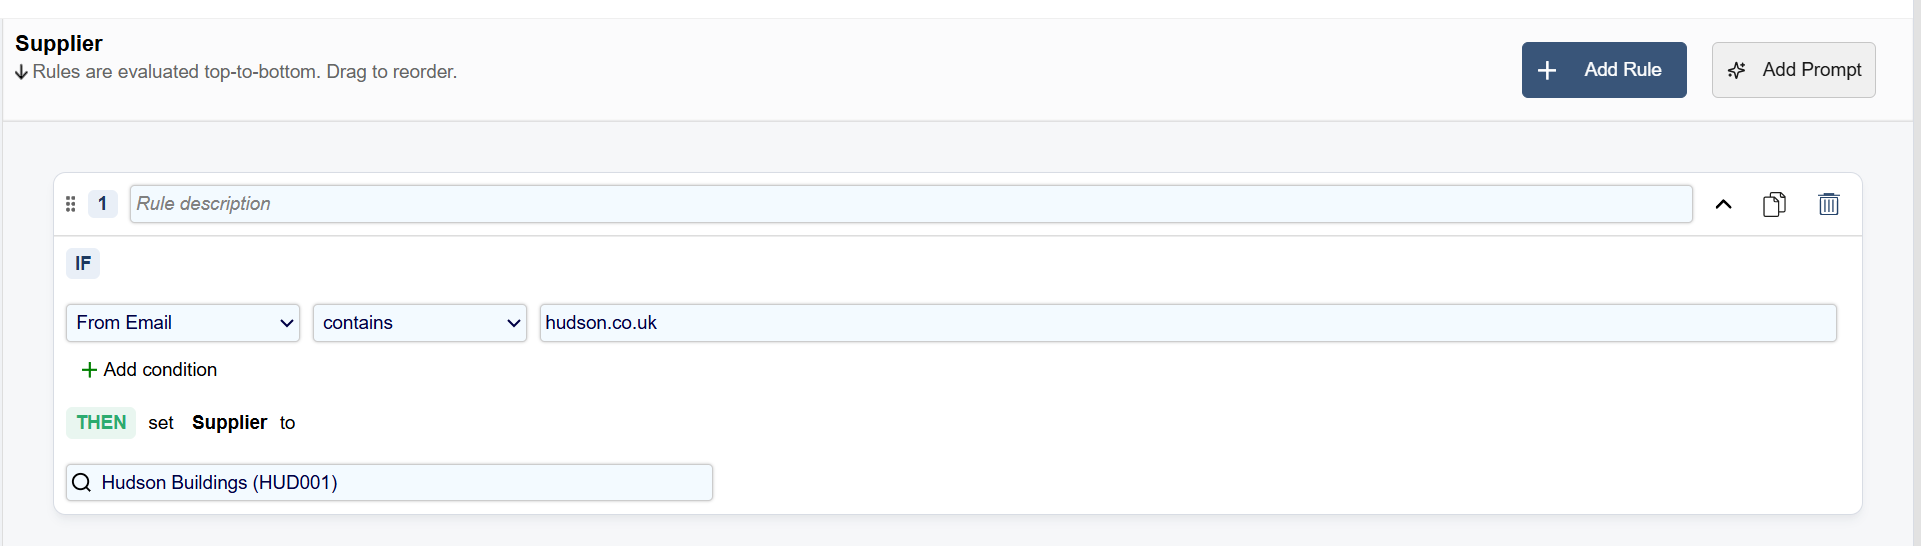
Example
An example of a common rule:
Condition: From Email contains “hudson.co.uk”
Action: Set Supplier to “Hudson Buildings”
This ensures that invoices received from a known email are automatically assigned to the correct supplier.
Available Attributes
Automation rules can be applied across a wide range of attributes, including:
Document header fields
Line-level fields
Custom attributes
Projects
This allows for flexible and detailed control over how invoices are populated.
The screen has two sections. On the left you will find Target Fields, this is where you select the attribute you wish to change. For example, you can select a specific Supplier based on an email address or subject.
Automation rules provide a structured way to automate invoice processing at the draft stage. By defining clear conditions and outcomes, organisations can reduce manual effort, improve accuracy, and maintain consistent data entry across invoices.